(日本語翻訳はこちら)
Hello. I’m Hiro.
In this article, I will show you the basic operations of Builder.io, a headless CMS that allows you to easily create responsive HTML designs and export them as HTML.
There are now several services that allow you to build responsive designs with GUI screen controls.
If you are reading this article, you may have heard of services such as STUDIO and Webflow that allow you to create web pages with no code.
The reason why I’m introducing Builder.io, which is not as well known as STUDIO and Webflow, is because it not only makes responsive design easy, but also offers other unique features such as “free HTML export” and “easy configuration of javascript“.
In this article, after a brief comparison with STUDIO and Webflow, I will tell you about the basic operations of Builder.io and the actual flow of exporting as HTML.
- Those who want to build responsive design easily with GUI operation
- Those who want to build HTML design with no code
- Those who want to build HTML easily and even export HTML
- Those who want to easily configure button click behavior from GUI screen
Tools to build responsive web designs with no code

Tools for building responsive designs with no code are gradually gaining attention.
Among them, some of you may know tools such as STUDIO, Webflow and Wix.
I will compare these services with Builder.io and introduce the features of each.
To make the comparison easier to understand, I will first briefly explain the features of each service.
Builder.io
This tool allows you to build a responsive design with no code. However, knowledge of CSS is required to make minor adjustments.
What makes it different from other tools is that it allows free HTML export. Also, CSS and javascript can be edited from the tool, so I think it has the widest range of customization.
Also, since HTML can be exported, the backend can be coded in python.
This gives it a great advantage that it can be used for designing application screens.
With a free account, you can publish your site and export HTML. However, if you want to publish your site to your own domain, you will need a paid account.
STUDIO
This is a tool from Japan provided by STUDIO Inc.
It is very easy to understand and use.
Pages created on the STUDIO can be published on the STUDIO server. However, HTML export is not possible and it is not possible to run on your own server.
Free accounts are also available, but since you cannot set up your own domain, you will need a paid account for practical use.
Webflow
Webflow has a very large number of accounts and is one of the most used no-code tools in the world.
The operation is very easy to understand, and since there are many reference sites, it is easy to learn how to use.
You can choose whether to publish the pages you create on Webflow on the Webflow server or output them as HTML.
This depends on the plan you choose when you create your account, either the “Publish Site Plan” or the “Export HTML Plan”.
Free accounts are also available, but neither site publishing nor HTML output is available.
Wix
Wix is a no-code tool with over 200 million users worldwide.
It used to be a website creation and publishing tool for creating websites by customizing templates, but with the introduction of Editor X, which allows users to build responsive designs from scratch with no code, flexible web design is now possible.
I think this means that Wix has adopted the trend of web page building tools such as Webflow and STUDIO that allow flexible design.
Wix is different from the others in that you can incorporate pre-designed functions such as contact forms, reservation tools, chat, etc. with no code.
Pages created on Wix can be published on the Wix server. However, HTML export is not available and it is not possible to run on your own server.
A free account is also available, but since it displays page-top ads, a paid account is required for practical use.
Comparison Summary
| Builder.io | STUDIO | Webflow | Wix | |
| ノーコード | Add elements to be used and design with GUI operations |  Add elements to be used and design with GUI operations | Add elements to be used and design with GUI operations | In addition to GUI operation, reservation and chat functions can be configured |
| 直観性 | Partly confusing | Easy to understand operation | Easy to understand operation | Operability can be selected |
| カスタム性 | Various JS and CSS behaviors can be configured |  Cannot configure JS and CSS | Cannot configure JS and CSS | Cannot configure JS and CSS |
| 無料利用 | Free HTML export so you can use it in your own server design |  The free version cannot export HTML, making it difficult to use in practice | The free version cannot export HTML, making it difficult to use in practice | The free version cannot export HTML, making it difficult to use in practice |
| HTMLエクスポート | possible | Impossible | Only available in the paid version | Impossible |
I think these no-code tools should be used differently depending on the user’s knowledge level.
Wix is superior to other tools in that it allows you to edit and quickly build a site based on a template. No CSS or javascript knowledge is required.
STUDIO and Webflow require knowledge of CSS and javascript when designing a site, but are suitable for creating pages designed in illustrator and figma.
Builder.io is good for building in various functions with javascript and building applications with exported HTML, knowledge of CSS and Javascript is required.
Additional information about Builder.io

A few more words about Builder.io.
Builder.io is a drag-and-drop page builder, and also functions as a headless CMS.
Headless CMS is a system that allows you to output designs from other code using APIs.
This gives you a lot of flexibility to design pages that can be embedded in applications.
What Builder.io can do depends on the price plan, so I will introduce it here.
Price Plans
Even with the free plan, you can create drag-and-drop designs and configure output settings with Headless CMS.
Therefore, you can also export your drag-and-drop designs to HTML.
However, the biggest thing to remember is that the free plan has a monthly PV limit.
The free plan has a limit of 10000 PV/month, so if you expect to have more than that, you will need a paid plan.
The following is a list of what each plan can do.
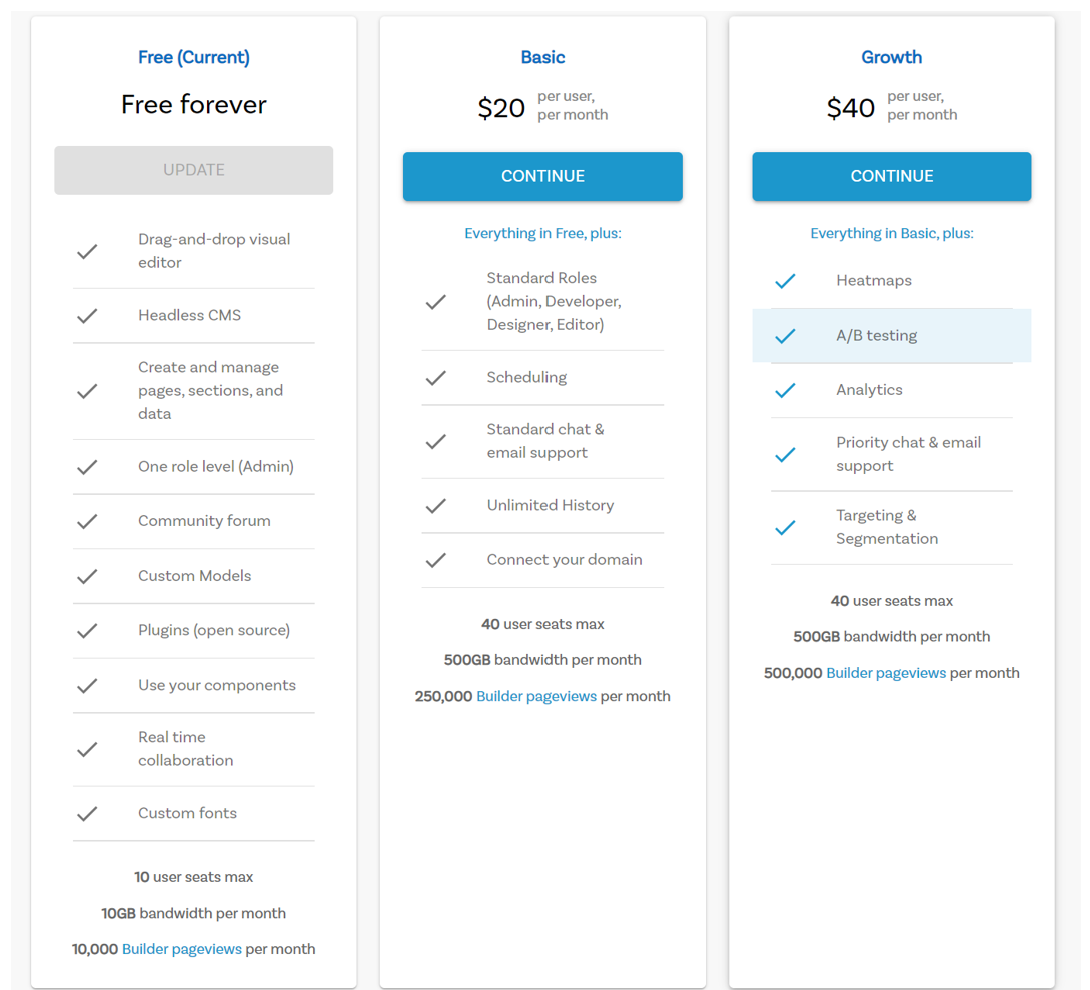
Free Plan
- Drag and Drop Editor
- Headless CMS
- Create and manage pages, sections, and data
- Only Admin privileges can be granted to users
- Using the Community Forum
- Up to 10 users can be created
- 10GB bandwidth limit per month (If you have heavy images, the bandwidth limit may become a bottleneck.)
- 10000 PV limit per month
Basic Plan
- Granting Admin, Development, Design, and Editing rights to users
- Schedule publishing function
- Chat and email support
- Unlimited history functions
- Ability to set your own domain name
- Up to 40 users can be created
- 500GB bandwidth limit per month (If you have heavy images, the bandwidth limit may become a bottleneck.)
- 250000 PV limit per month
Growth Plan
- Heat Maps
- A/B testing
- Access analysis
- Prioritized chat and email support
- Segmented targeting
The biggest bottleneck with the free plan is the bandwidth or PV per month, and if you are using HTML output (as a headless CMS), you don’t need your own domain.
If bandwidth or PV per month is a bottleneck for you, you should have no problem using the Basic Plan.
The Growth Plan is more of a web marketing and SEO feature than a design or page output feature, so you may want to choose a tool that can be used universally.
Basic usage of Builder.io
Now, let’s take a look at the basic usage of Builder.io.
First, create a free account from the Builder.io official website and log in.
After logging in, your screen should look like the following.
As shown below, you can create a new page by clicking on the “+New” button, and the created page will be displayed as a list, so you can go to the page editing screen by double-clicking on it.
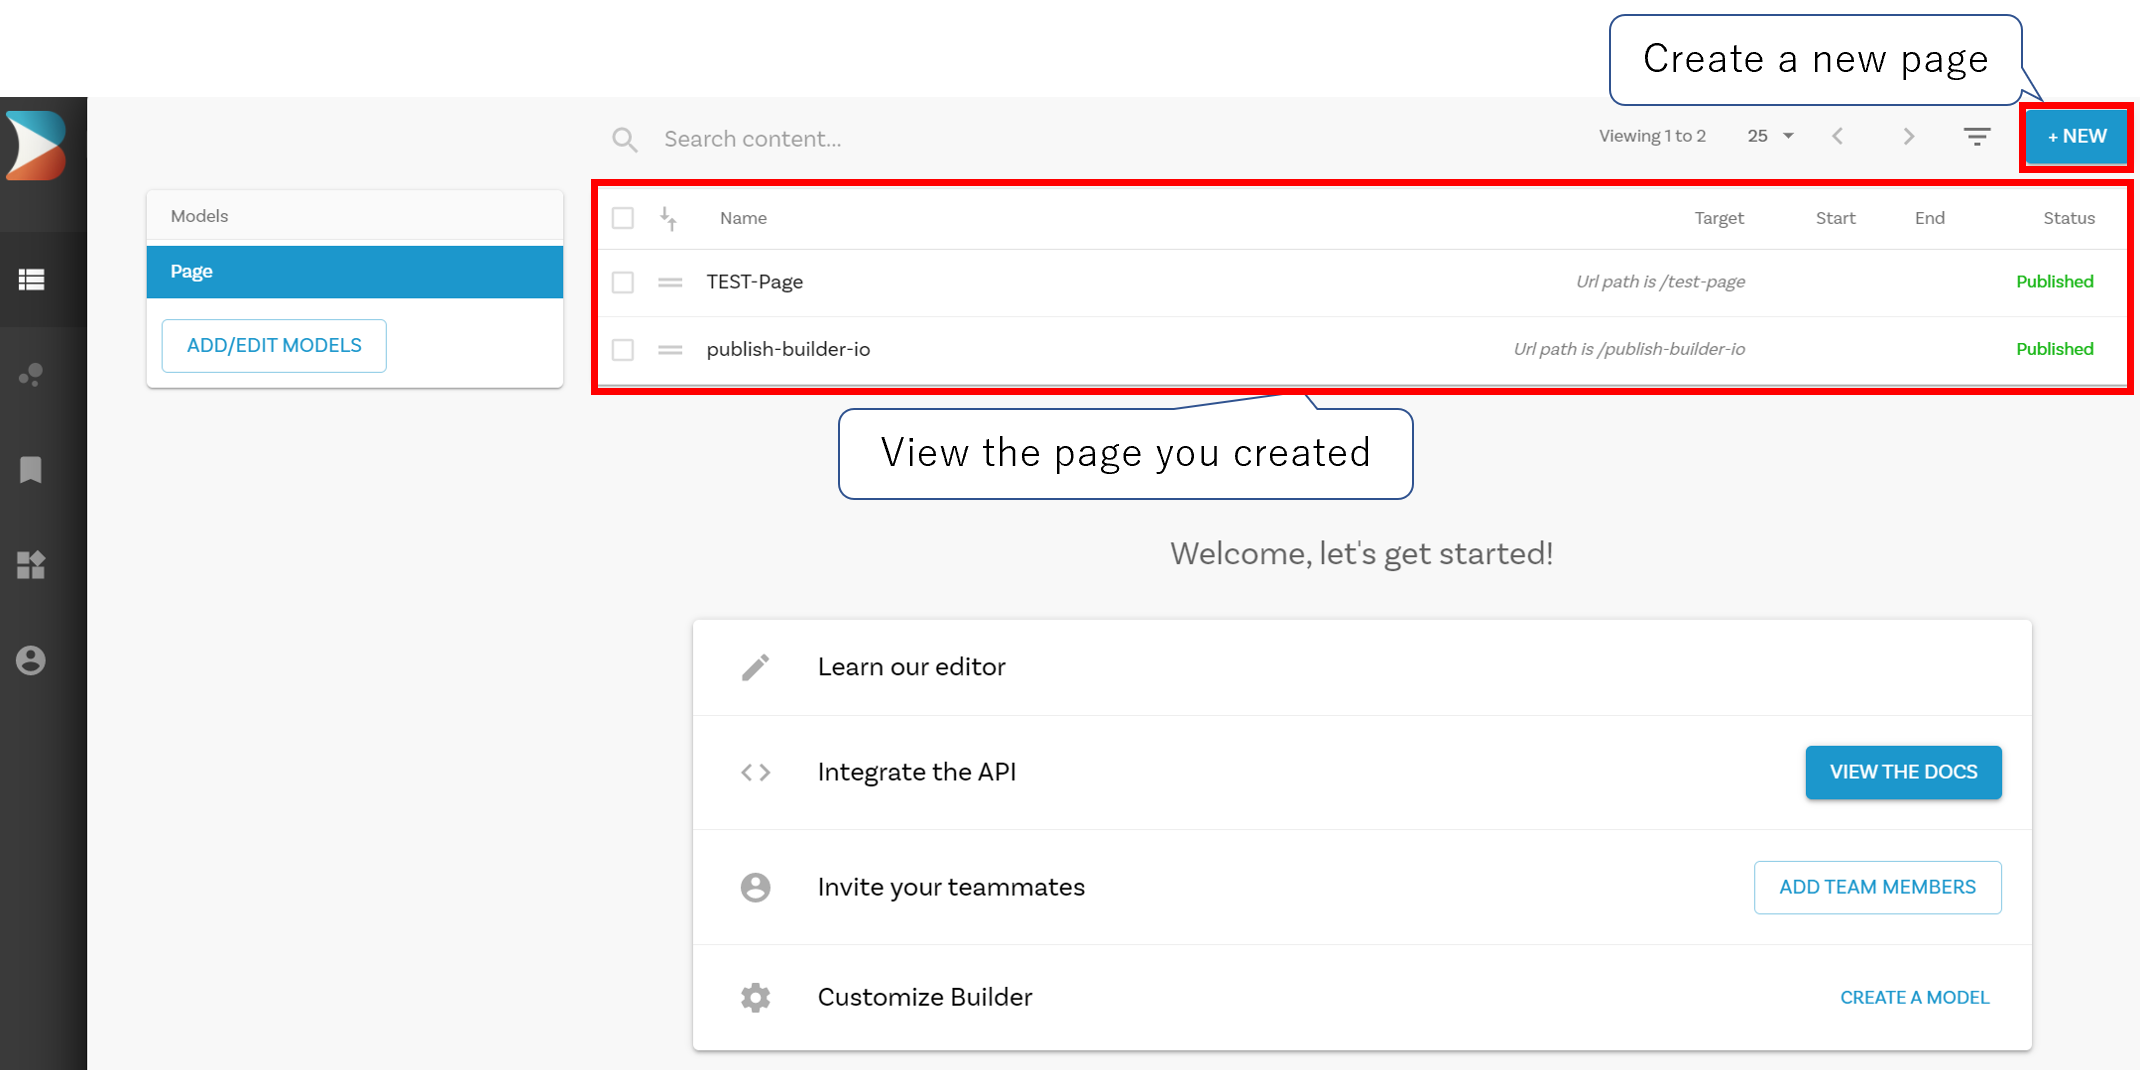
Next, we will explain how to use the Edit Page screen.
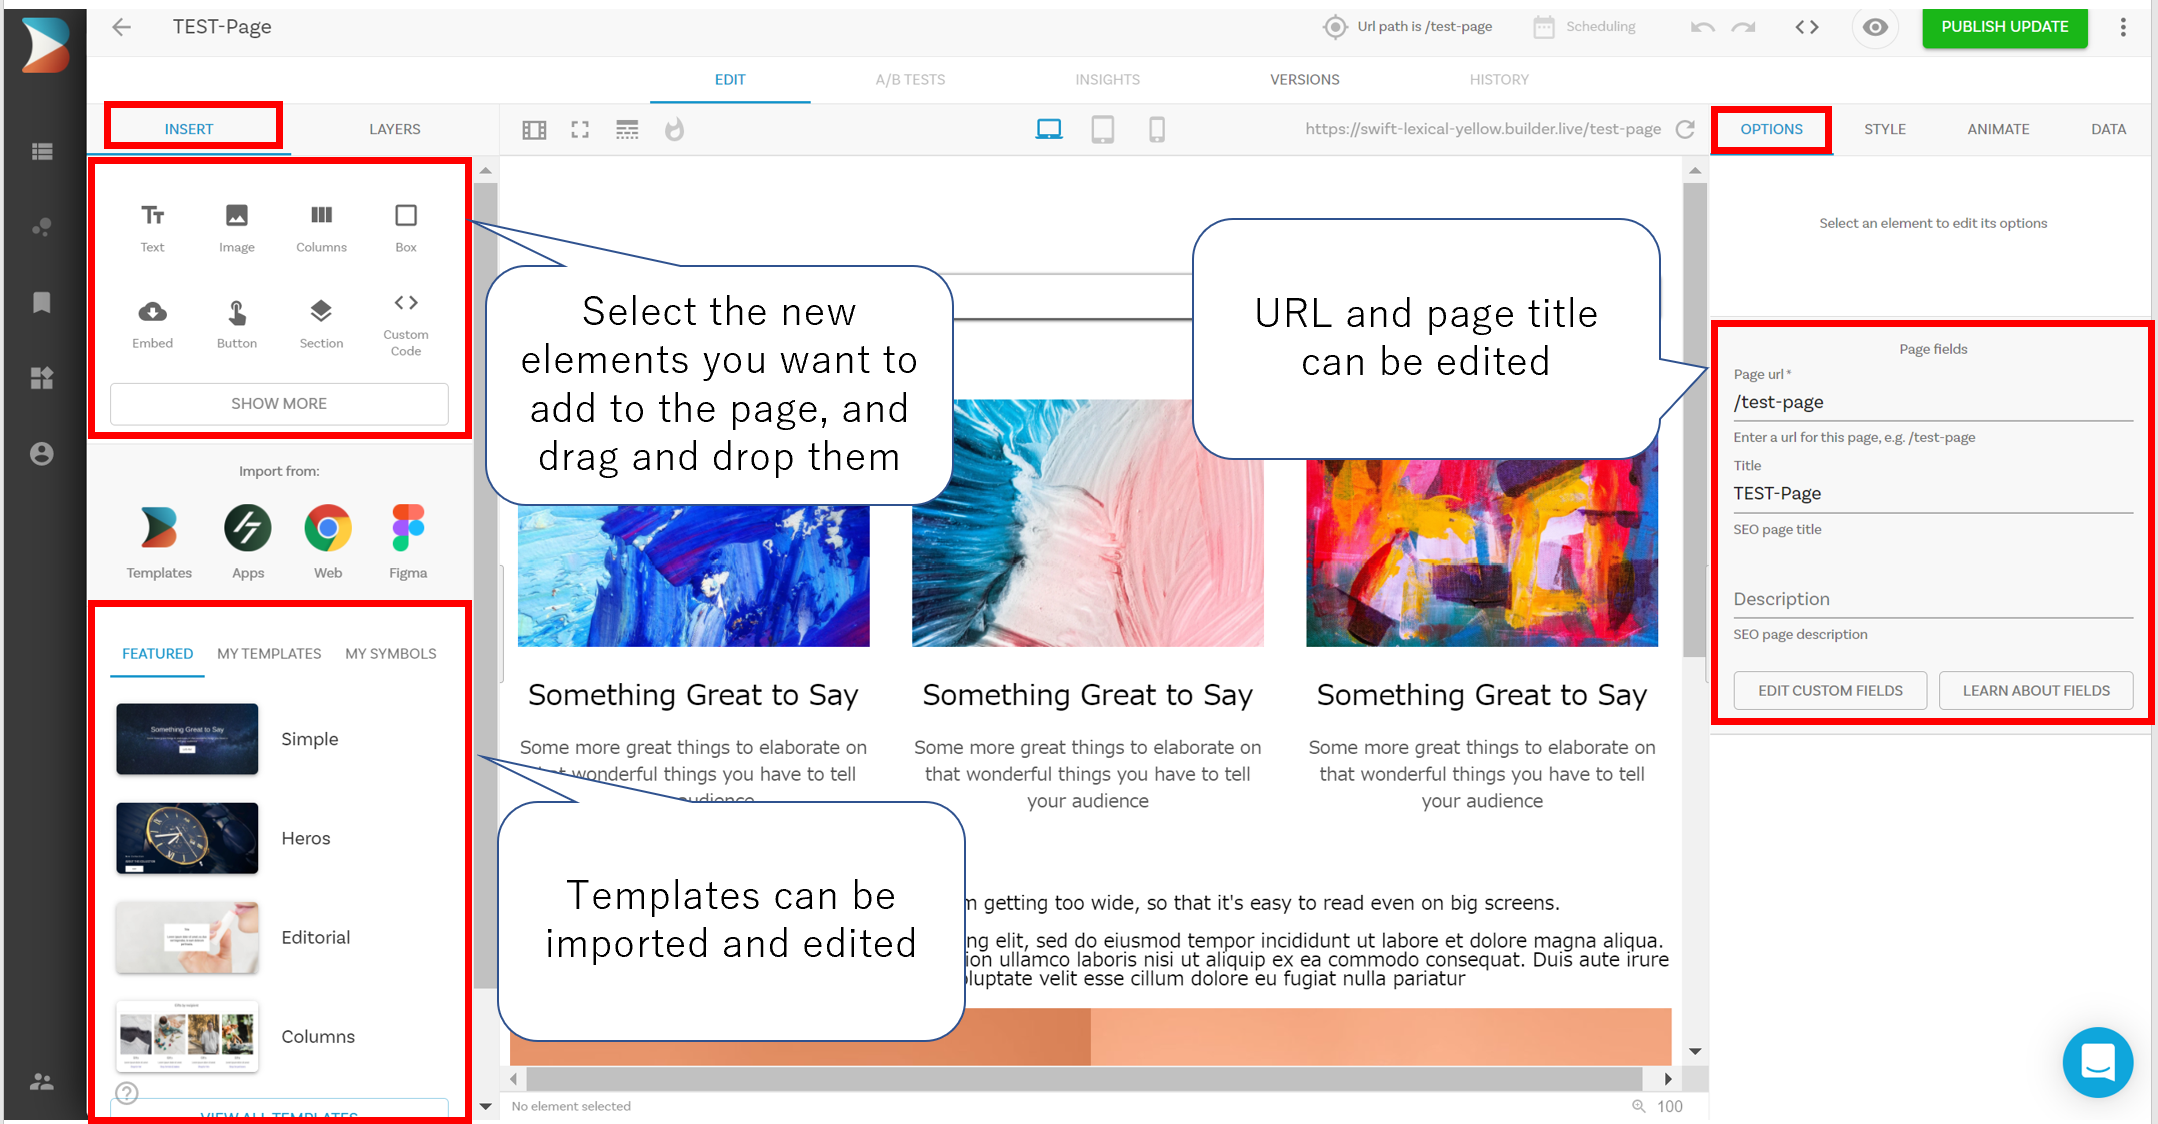
When you open the editing window, you will not see anything in the middle page section.
Adding a new element can be done from the “INSERT” tab below. You can select the elements you want, such as text or input fields, and add them to the page by dragging and dropping them.
You can also add and edit templates. You can drag and drop templates under the “INSERT” tab to add them to the page.
In the “OPTION” tab on the right side of the screen, you can set the URL of the page and the page title.
However, if you are exporting and using it as a Headless CMS, you do not need to pay much attention to the URL.
The value you set for Title will be used as the title of the page when it is exported, so we recommend that you check it.
You can also check the “LAYER” tab to see what the HTML components look like.
Then, from the “STYLE” tab on the right side of the screen, you can set the CSS.
The CSS section is an important part of the page design, so it will be explained in detail below.
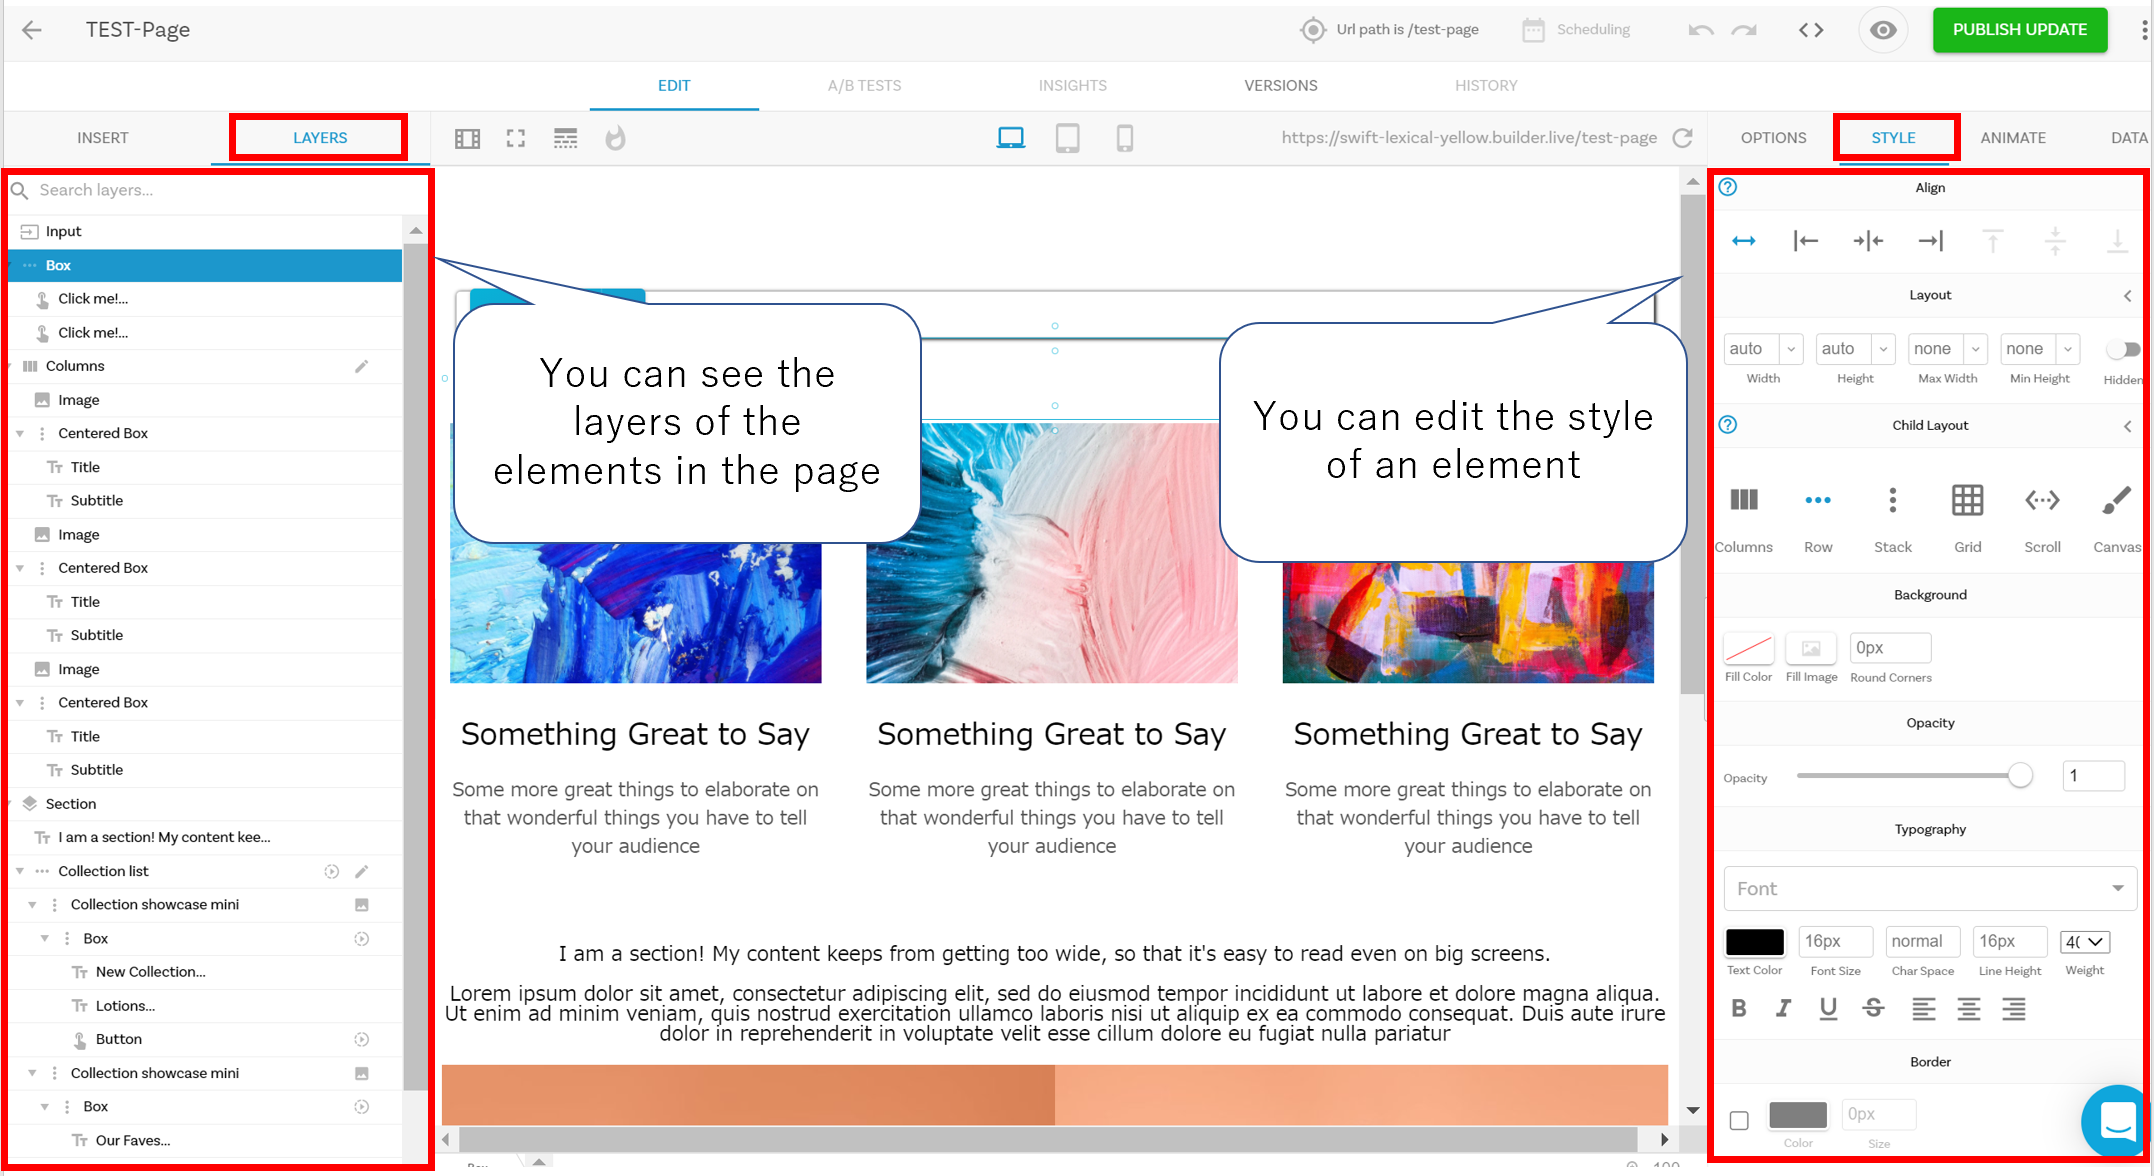
The items that can be set in the “STYLE” tab above are as follows.
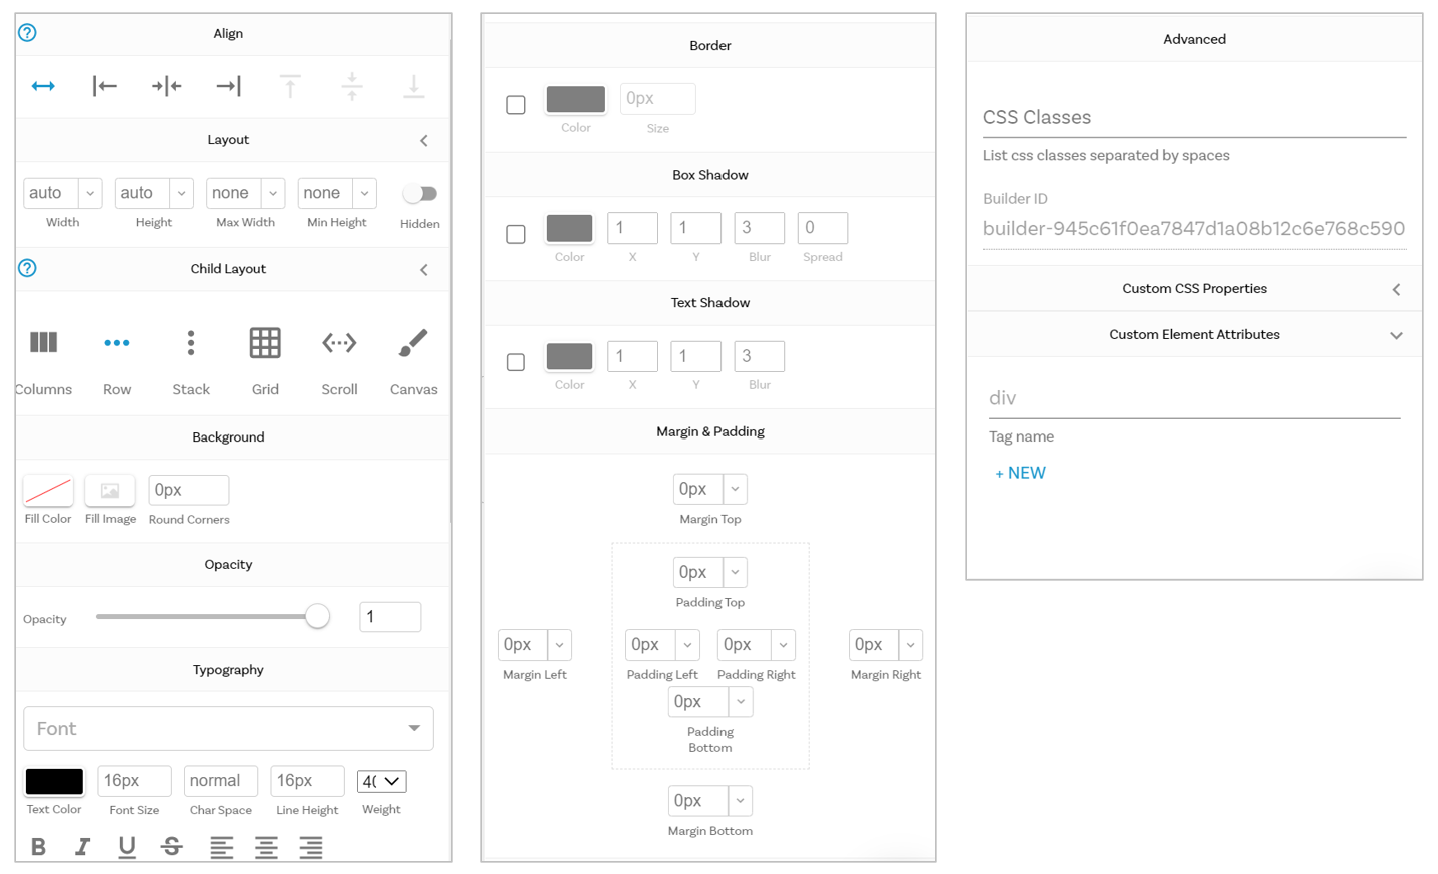
- Align:You can select whether the element should be left-justified, center-justified, or right-justified.
- Layout:You can set the Width, Height, Max Width, Min Height, and whether or not to make it hidden.
- Children Layout:You can choose whether to pile the grouped elements vertically or horizontally.
- Background:You can set the background color and background image.
- Opacity:You can set the transparency of the elements.
- Typography:You can set the color, size, font, left-justified, center-justified, right-justified, bold, slanted, and subscript of the text.
- Border:You can set the border of the element.
- Box Shadow:You can set a shadow for the element.
- Text Shadow:You can set a shadow for text in an element.
- Margin & Padding:Margin and Padding can be used to set the outer and inner margins of an element.
- Advanced:You can set the Class attribute of any HTML element.
- Custom CSS Properties:You can set your own CSS.
- Custom Element Attributes:You can set any attributes of HTML elements.
Of these, the great thing about Builder.io is that you can set any CSS, set any Class attribute, and set any attribute of any HTML element.
It requires knowledge of HTML and CSS, but if you know them, everything that can be achieved by manual coding can be achieved on Builder.io.
The great thing is that it is easy to understand and quick to set up from the screen as long as you have knowledge of HTML coding.
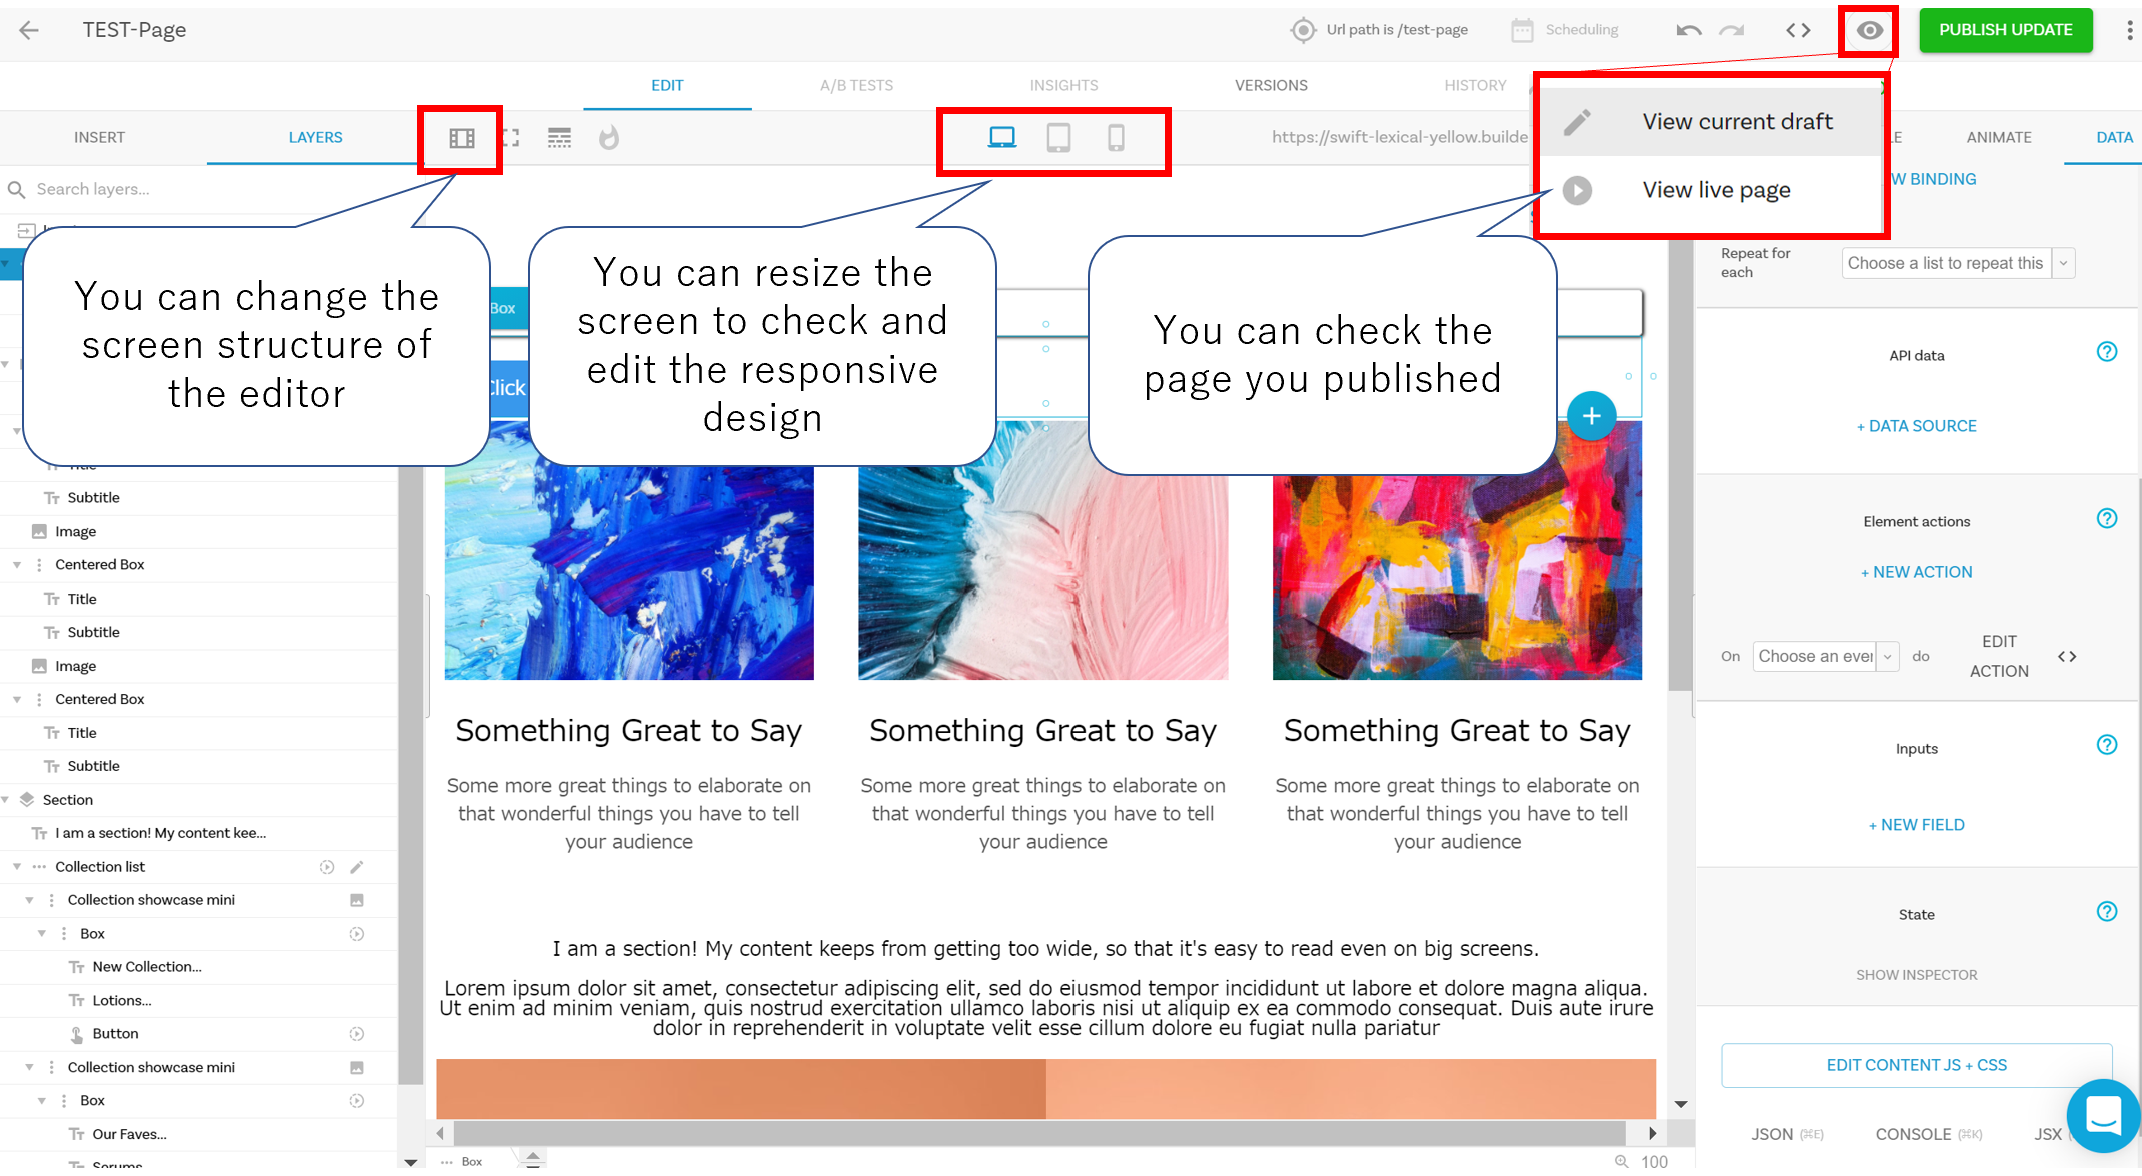
There is also a button that allows you to change the screen structure of the editor, as shown below.
For example, you can hide the right tabs and make the page editing area more visible to view the elements.
You can also resize it on the editor to PC screen size, tablet screen size, or smartphone screen size to check if it is responsive.
The point is that if you want to change the CSS for smartphones, you can set the CSS to be applied at smartphone size separately by editing “STYLE” after pressing the smartphone size view button.
To set responsive elements, you can edit the “PC Size Screen” element, then change it to “Tablet Size Screen” or “Smartphone Size Screen” and edit the CSS further.
You can also check the published page from the top right corner by clicking “View live page” below.
However, the “View current draft” button seems to take you to a 404 screen when pressed.
In the “DATA” tab, you can set the behavior when some action is taken on the element, such as “behavior when clicked”.
Click on “Element Action” and choose which behavior you want to write the code for.
After that, click “EDIT ACTION” to open the javascript editor and write your javascript.
You can also write javascript and CSS that will be applied to the entire page by clicking the “EDIT CONTENT JS + CSS” button at the bottom.
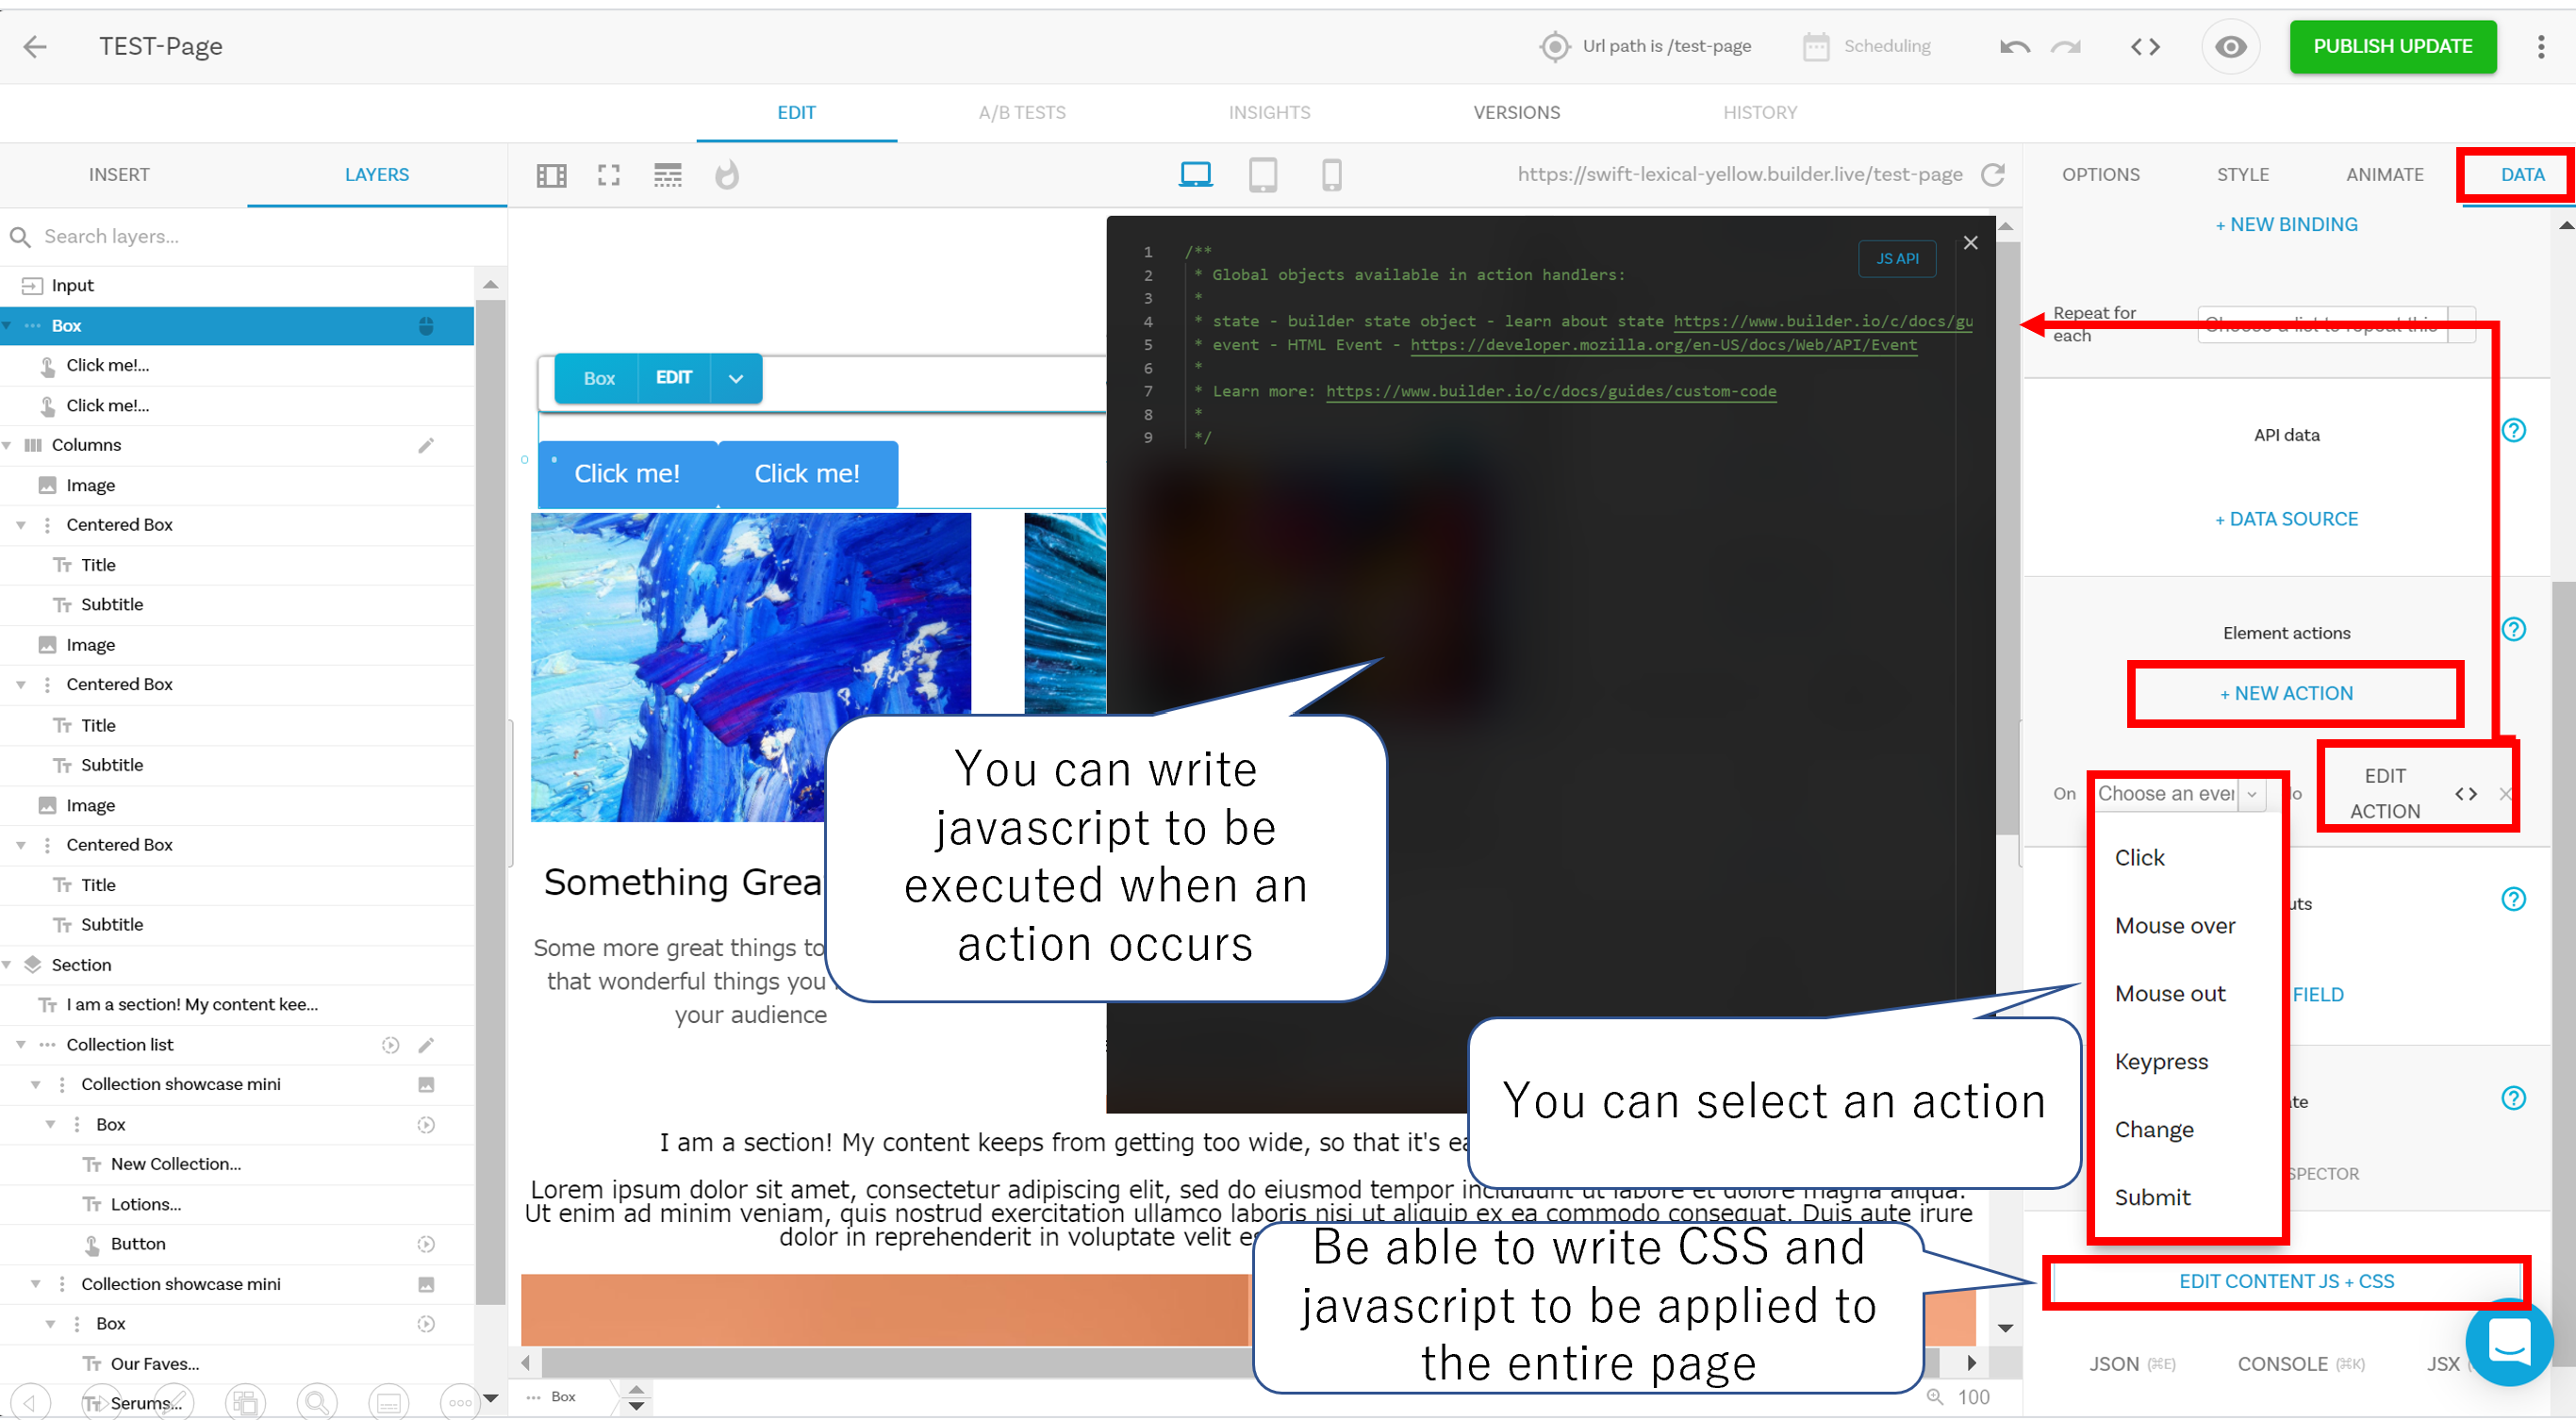
The great thing is that you can even write javascript, so actions such as clicking on elements created in Builder.io will work smoothly if you write the javascript here in Builder.io.
Output to code
This section describes how to use the pages you have created externally.
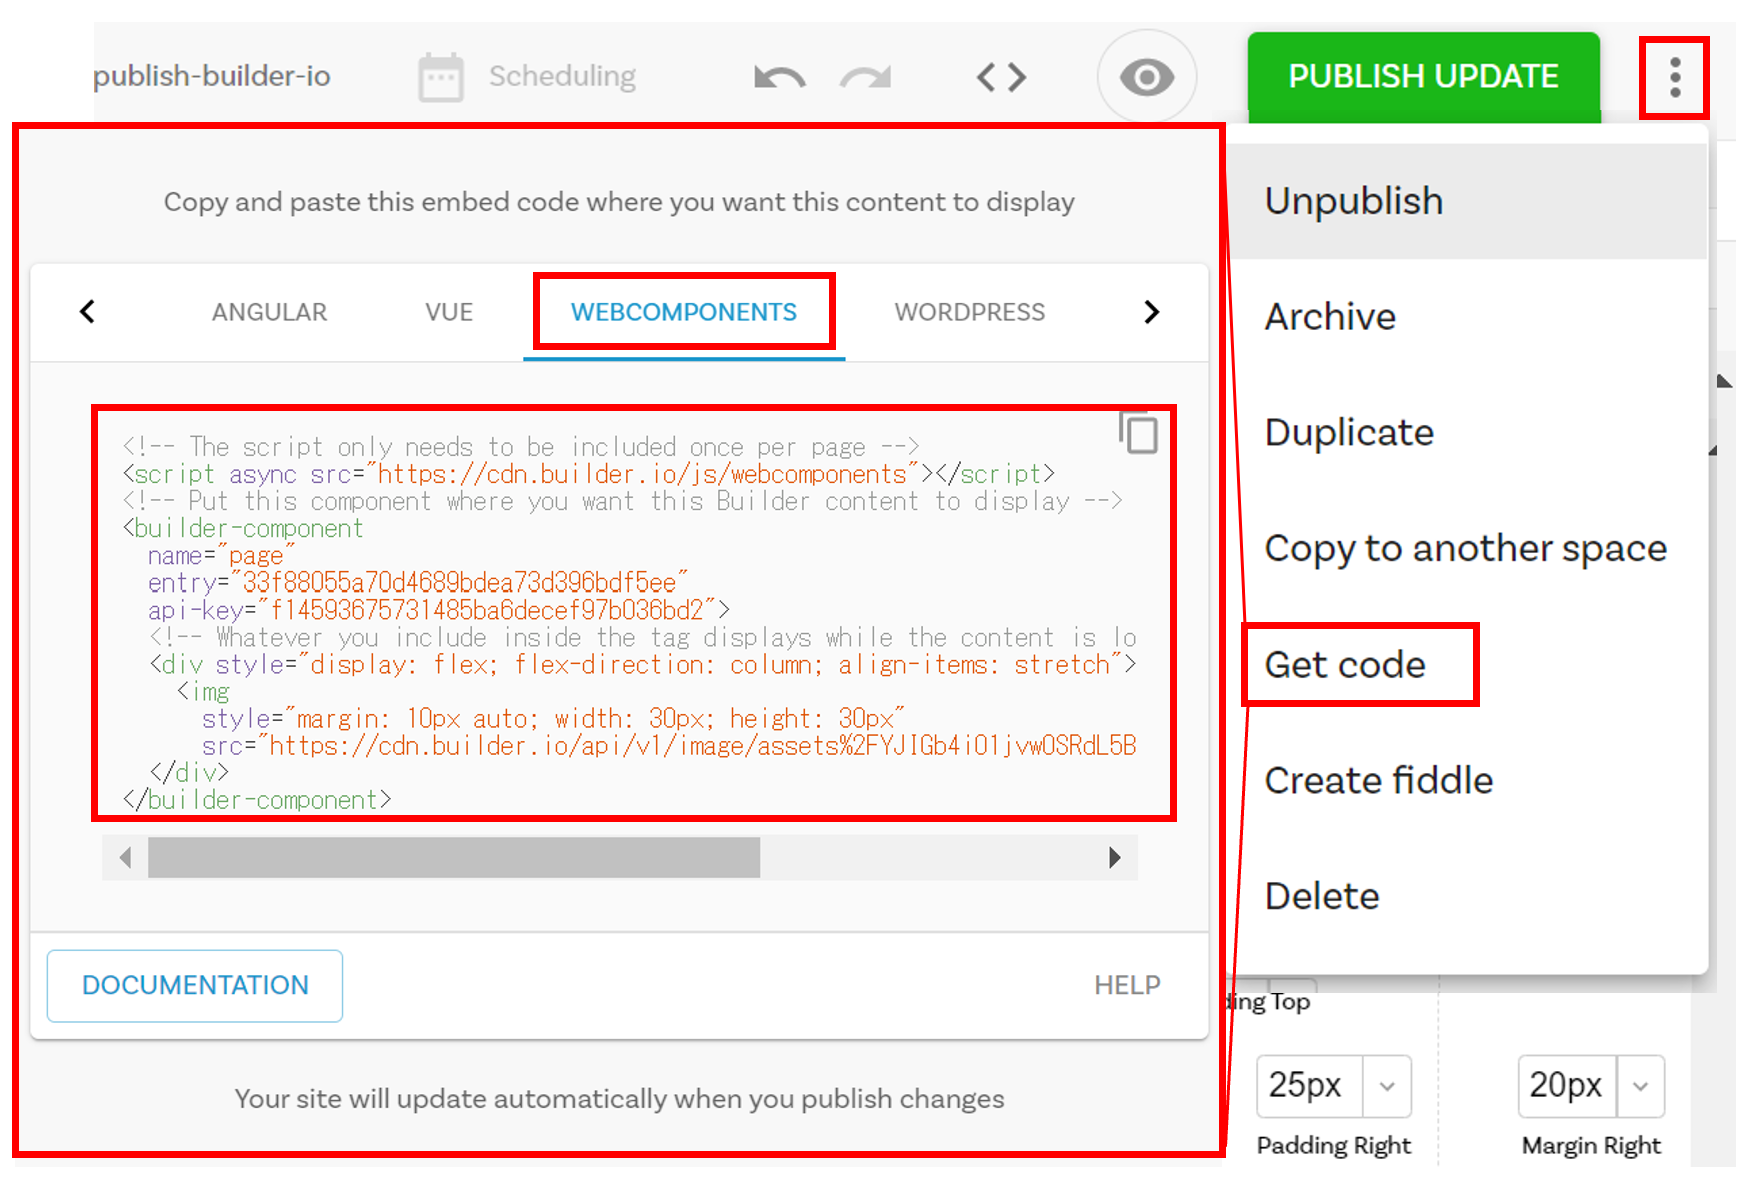
First, publish from the “PUBLISH UPDATE” button in the upper right corner.
Then you can see the published page from the “view live page” button above.
After that, you can output the code to be incorporated into the HTML by pressing “Get Code” as shown below.
By pasting this code, you can use it in HTML or use it as a screen of your application.
Sample of a page created with Builder.io
Finally, for those who want to check if the page output by Builder.io is really responsive, here is a simple page I created.
You can see that the elements change to responsive by changing the browser screen as shown above.
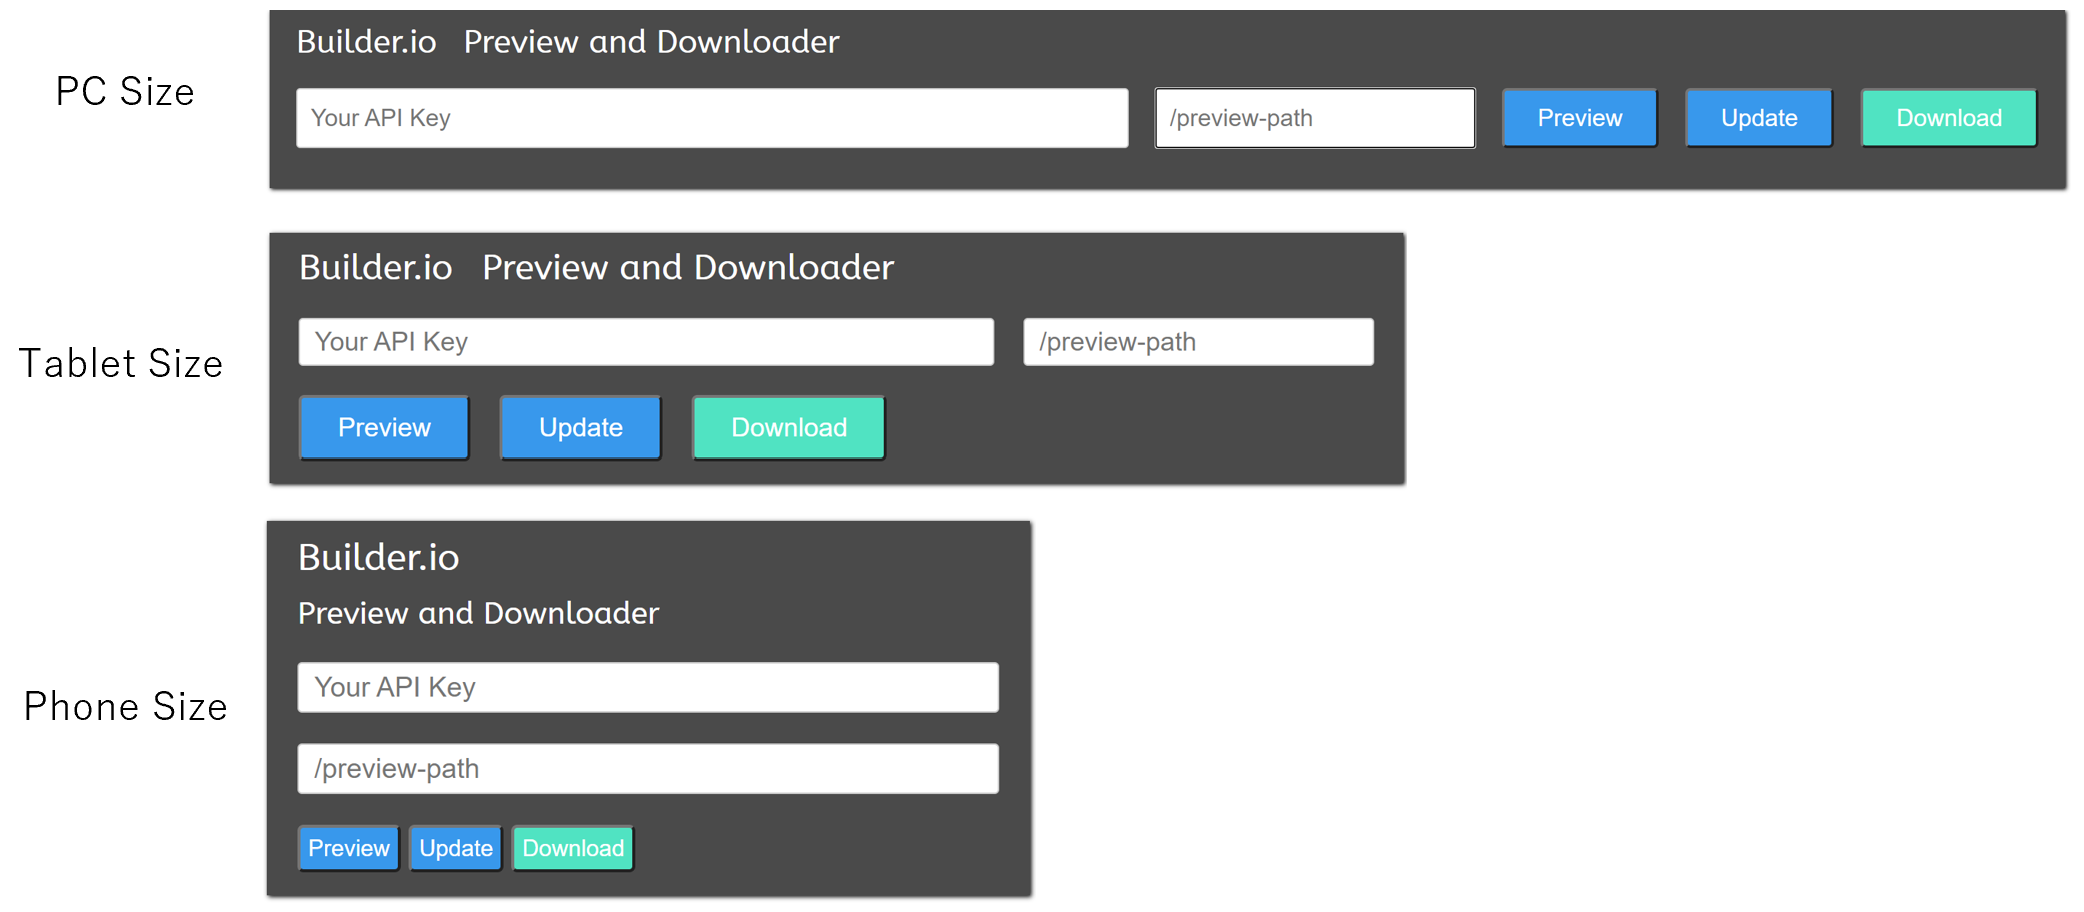
You can also view the pages you create from this page in your browser or download them as HTML. Here is how to use it.
Preview of the created page
After publishing, check the “URL” of the page you have created. You can check the URL from “OPTIONS” in the right sidebar as shown below.

After that, click on the human-shaped icon on the left to check the API Key, as shown below.
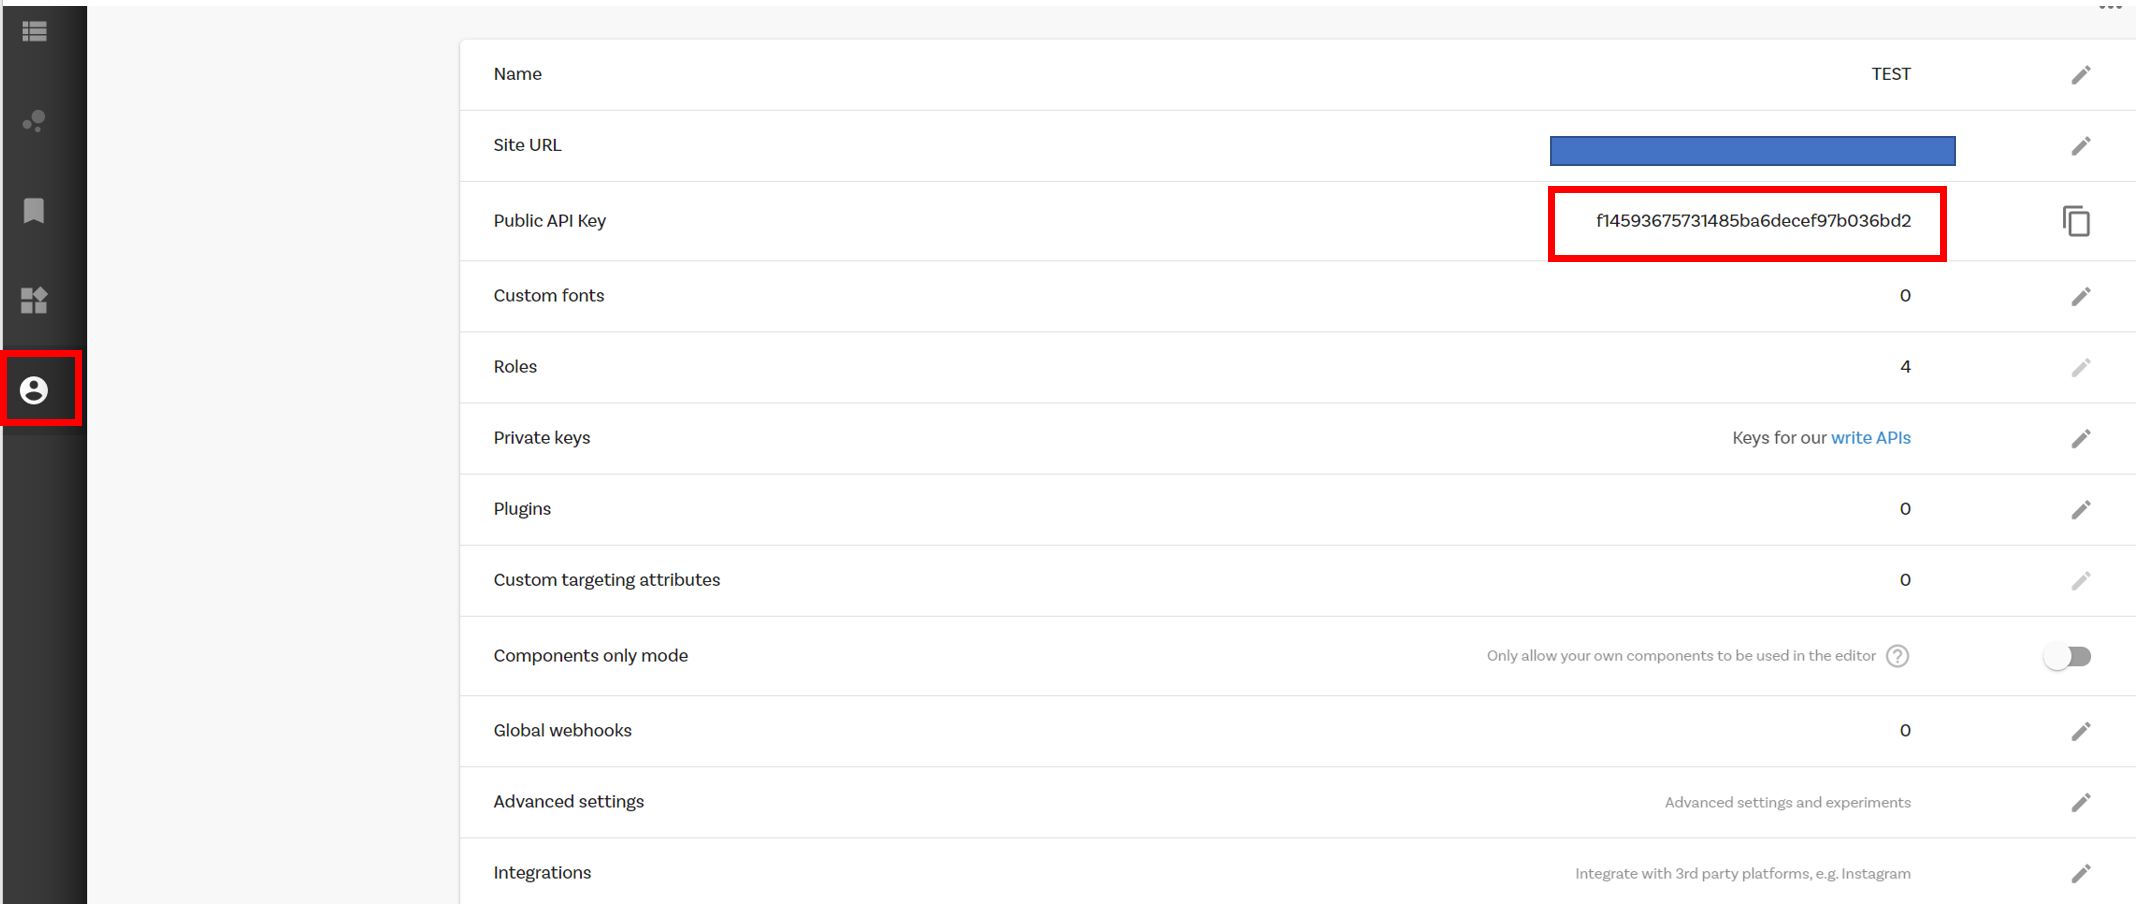
Enter the “URL” and “API Key” that you confirmed from above, and click the “Preview” button to display the page you have created.
You can also download the elements that will be output as HTML by clicking the “Download” button.
This is useful for checking whether the class attribute or any other attribute of the HTML element is set as intended.
In closing
Thank you for reading to the end.
I have been looking for a way to create responsive screens, and so far I can recommend the method using Builder.io as it is the most customizable.
If you have knowledge of CSS and javascript, you will be able to take full advantage of Builder.io.
That’s all.