はじめに
今回はEC2でSoftEtherを用いて、自宅PC(Windows)からVPN接続(L2TP over IPsec)するまでの手順をまとめました。
固定IPを持っている方ならセキュリティグループでIP制限をすればセキュリティが担保できますが、固定IPを持っていない場合にVPN接続が一つの選択肢になるのではないでしょうか。
SSHやRDPするだけであれば、セッションマネージャーを用いてアクセスすればよいのですが、wordpress管理画面などのwebコンソールにアクセスする場合などはVPNを張る場合も多いと思います。
今回はEC2でVPNを設定するまでの手順をまとめることで、今後本記事を参照することで設定手順を思い出したり、調査する手間を省くことを目的とします。
なお、セッションマネージャの使い方は別で記事を書いているので興味がある方はそちらも参照してください。
(WindowsのEC2にAWS Systems Managerでアクセスする)
時間目安と前提
作業時間の目安
本手順は15分~30分で完了する程度の内容です。
下記の前提をクリアしていれば毎回同じ手順で、ソースコードをコピペすれば高速に設定を完了できます。
環境などの前提事項
本記事で紹介する手順は以下の環境が前提です。
- VPN Server : EC2(CentOS6系(Amazon Linux)、CentOS7系(Amazon Linux2))
- クライアントPC: Windows10
EC2のAWS設定
さっそく設定手順に入ります。
EC2はあらかじめ用意してください。作成時にいつもと変更する必要はありません。
ただし、以下の追加設定をしてください。
セキュリティグループ
VPNの通信を通すために、以下のインバウンドを許可してください。
プロトコルはUDPなので注意してください。

Elastic IP
Windowsから接続する際にIPを指定するため、Elastic IP (EIP)でIPを固定してください。
AWS EC2はEIPを設定していない場合、起動するごとに異なるパブリックIPが割り当てられてしまいます。
2021/2/26追記
Elastic IPのコストを節約したい方向けに、Elastic IPを使わずに名前解決で接続先を固定する方法を以下に記載しました。コスト削減につながるので是非実施してください。
VPN Serverの準備
必要なパッケージの確認
下記のコマンドでパッケージがインストールされているか、アップデートはないか確認してください。
$ sudo yum -y update
$ sudo yum -y install git gcc
SoftEtherのダウンロード
SoftEtherダウンロードサイトから最新版をダウンロードしてEC2にアップロードします。
VPN Serverのサービス作成
EC2が立ち上がった時に自動起動するようにサービス化していきます。
解凍
任意のディレクトリにアップロードしたtar.gzファイルを解凍してください。
下記はコマンド例です。バージョンによってファイル名を変えて実行してください。
$ tar zxvf softether-vpnserver-v4.34-9745-rtm-2020.04.05-linux-x64-64bit.tar.gzmakeコマンドの実行
解凍してできたディレクトリに移動し、makeコマンドを実行します。
$ cd vpnserver
$ make
ライセンスに同意するかなど聞かれますが、すべてYESでよいと思います。
サービスの作成
出来上がったvpnserverディレクトリを任意の場所に移動して、サービス化します。
下記の例では/etc/vpnserverに配置しています。
また、CentOS6とCentOS7でサービス作成の手順が異なるので注意してください。
- CentOS6
$ sudo mv vpnserver /etc/vpnserver
$ sudo vi /etc/init.d/vpnserver/etc/init.d/vpnserverの中身は以下の通りです。/etc/vpnserver以外の場所に配置している場合は「DAEMON=/etc/vpnserver/vpnserver」を変更してください。
#!/bin/sh
# chkconfig: 2345 99 01
# description: SoftEther VPN Server
DAEMON=/etc/vpnserver/vpnserver
LOCK=/var/lock/subsys/vpnserver
test -x $DAEMON || exit 0
case "$1" in
    start)
        $DAEMON start
        touch $LOCK
        ;;
    stop)
        $DAEMON stop
        rm $LOCK
        ;;
    restart)
        $DAEMON stop
        sleep 3
        $DAEMON start
        ;;
    *)
        echo "Usage: $0 {start|stop|restart}"
        exit 1
esac
exit 0- CentOS7
$ sudo mv vpnserver /etc/vpnserver
$ sudo vi /etc/systemd/system/vpnserver.service/etc/systemd/system/vpnserver.serviceの中身は以下の通りです。/etc/vpnserver以外の場所に配置している場合は「ExecStart」、「ExecStop」、「WorkingDirectory」を変更してください。
[Unit]
Description=Softether_VPN_Server
After=network.target

[Service]
Type=forking
User=root
ExecStart=/etc/vpnserver/vpnserver start
ExecStop=/etc/vpnserver/vpnserver stop
Restart=on-abort
WorkingDirectory=/etc/vpnserver/

[Install]
WantedBy=multi-user.target
サービスの自動起動設定
この手順もCentOS6とCentOS7で異なるので注意してください。
- CentOS6
$ sudo chmod 755 /etc/init.d/vpnserver
$ sudo /sbin/chkconfig --add vpnserver
$ sudo service vpnserver start- CentOS7
$ sudo chmod 755 /etc/systemd/system/vpnserver.service
$ sudo systemctl daemon-reload
$ sudo systemctl start vpnserver
$ sudo systemctl enable vpnserver
ここまでで、VPNサーバーのサービス化と自動起動設定が完了しました。
EC2ではあとはSoftEtherの設定をするだけです。
SoftEtherの設定
以下の手順に沿ってコマンドラインで設定していきます。
$ sudo /etc/vpnserver/vpncmdvpncmd command - SoftEther VPN Command Line Management Utility
SoftEther VPN Command Line Management Utility (vpncmd command)
Version 4.34 Build 9745 (English)
Compiled 2020/04/05 23:39:56 by buildsan at crosswin
Copyright (c) SoftEther VPN Project. All Rights Reserved.
By using vpncmd program, the following can be achieved.
1. Management of VPN Server or VPN Bridge
2. Management of VPN Client
3. Use of VPN Tools (certificate creation and Network Traffic Speed Test Tool)
Select 1, 2 or 3: サーバーの設定をするので「1」を入力します。
Specify the host name or IP address of the computer that the destination VPN Server or VPN Bridge is operating on.
By specifying according to the format 'host name:port number', you can also specify the port number.
(When the port number is unspecified, 443 is used.)
If nothing is input and the Enter key is pressed, the connection will be made to the port number 8888 of localhost (this computer).
Hostname of IP Address of Destination: 何も入力せずEnterで問題ありません。
If connecting to the server by Virtual Hub Admin Mode, please input the Virtual Hub name.
If connecting by server admin mode, please press Enter without inputting anything.
Specify Virtual Hub Name: 何も入力せずEnterで問題ありません。
VPN Server> HubCreate main
Password: 【任意のパスワードを入力】
Confirm input: 【任意のパスワードを入力】
HubCreate mainと入力し、ハブのパスワードを設定します。
VPN Server> HUB main
VPN Server/main> UserCreate hiro /Group:none /REALNAME:none /NOTE:noneグループ、本名、説明の入力は任意です。ユーザー名は例としてhiroとしていますが、任意に変えてください。
VPN Server/main> UserPasswordSet hiro
Password: 【任意のパスワードを入力】
Confirm input: 【任意のパスワードを入力】
UserPasswordSet 【ユーザー名】と入力し、ユーザーのパスワードを設定します。
VPN Server> IPsecEnable /L2TP:yes /L2TPRAW:no /ETHERIP:no /DEFAULTHUB:main

IPsecEnable command - Enable or Disable IPsec VPN Server Function
Pre Shared Key for IPsec (Recommended: 9 letters at maximum): 【用意した共有鍵を入力】
「IPsecEnable /L2TP:yes /L2TPRAW:no /ETHERIP:no /DEFAULTHUB:main」と入力し、IPsecを有効化します。
事前共有鍵を入力する必要があります。事前にこちらのサイトか何かで作っておいてください。
VPN Server/main> SecureNatEnable最後に「SecureNatEnable」と入力して、セキュアNATを有効化しておしまいです。
vpncmdは「exit」で抜けられます。
クライアントPC(Windows)の設定
コルタナ検索窓で「VPN」と入力し「VPNの設定」を起動します。
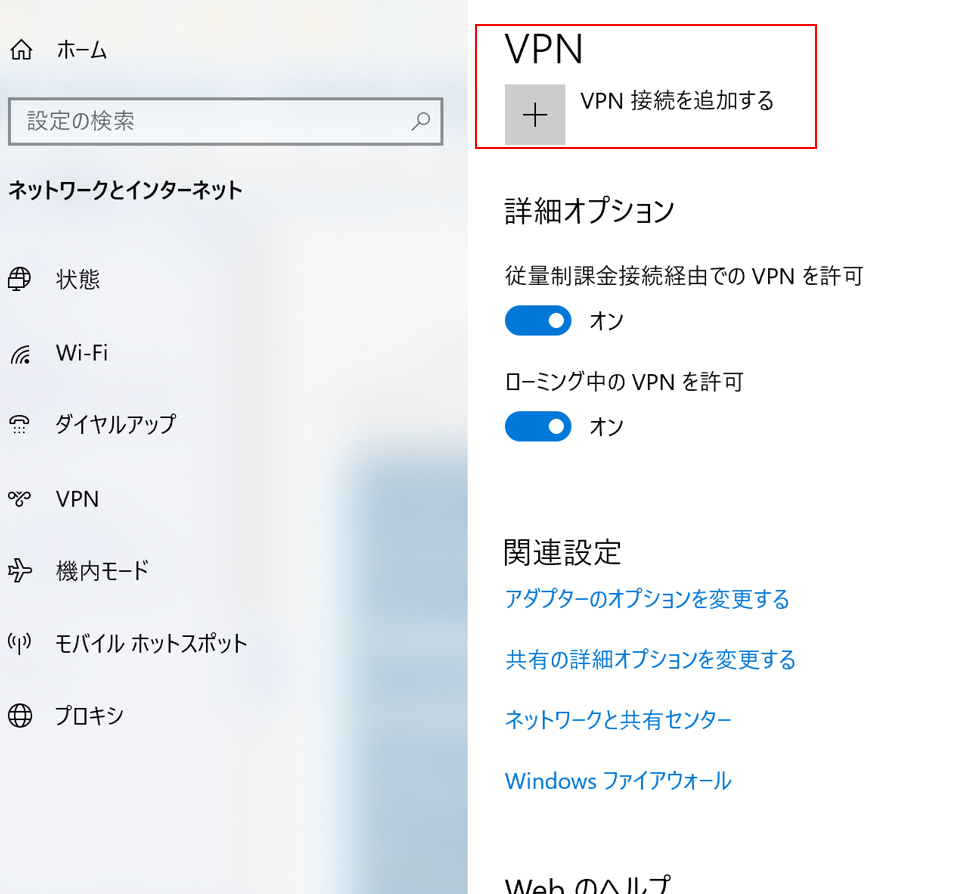
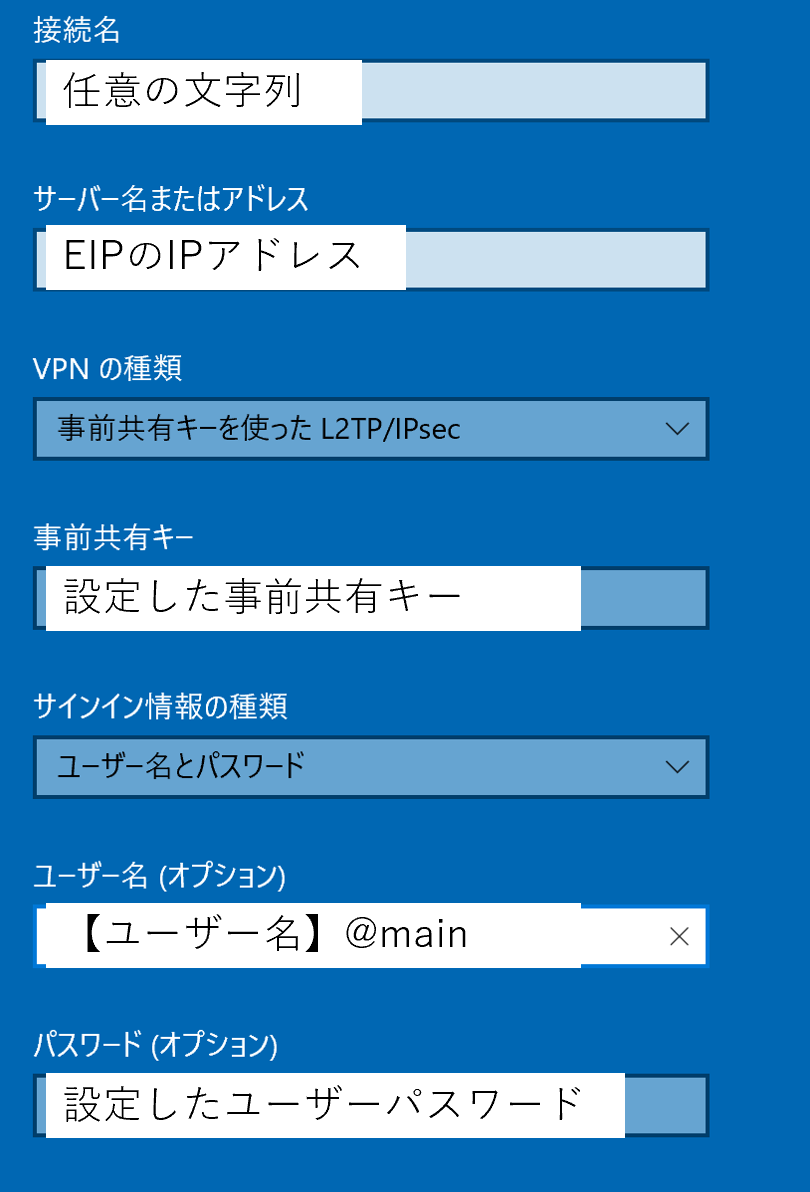
「VPN接続を追加する」で以下のように設定します。
後は下記のように接続するだけです。
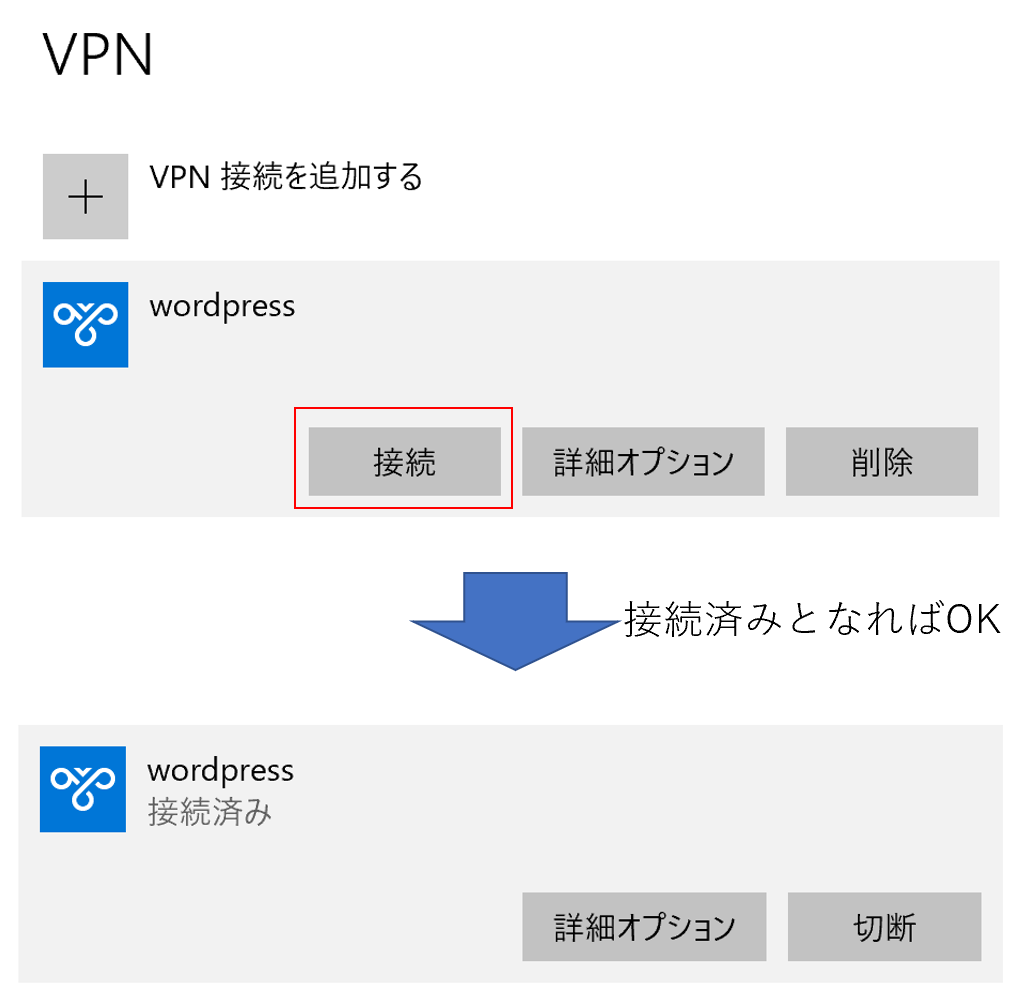
以上で、設定から接続まですべて完了です。
httpでアクセスしてみたり、ping打ってみたり、sshしたりして動作確認してみてください。
接続の際にはプライベートIPでの接続になるので注意してくださいね。
おわりに
いかがでしたか。VPNを張ると言うとちょっと敷居が高い気がしてしまうかもしれませんが、SoftEtherを使えば上記の手順のように30分あれば設定完了するくらいの作業量です。
手順を忘れた際には本記事を参照してもらえると幸いです。