はじめに
lambdaを定期実行してTwitter APIを叩き、
AM10時(JST)につぶやくbotを作成した。
一連の工程で以下の使い方について理解を深めた。
- Twitter APIの開始方法/使い方
- BitFlyer APIの使い方
- Cloud9 でLambdaをローカル検証し、リモートLambdaへのデプロイ
- Lambdaの定期実行
- LambdaからS3オブジェクトの読み取り/書き込み
botの構想
- 実行時間:日次AM10時
- 内容 :仮想通貨の価格変動に合わせてその日のメニューを提案
・ビットコイン前日上昇率:10%以上
 「今日は焼肉にしよう」
・ビットコイン前日上昇率:2~10%
 「今日は外食にしよう」
・ビットコイン前日上昇率:±2%
 「今日は自炊にしよう」
・ビットコイン前日上昇率:-2~10%
 「今日は冷凍チャーハンにしよう」
・ビットコイン前日上昇率:-10%
 「今日はモヤシ炒めにしよう」
Twitter APIの利用申請
こちらの記事に細かく載っていたのでここでは割愛。
申請する際に入力したのはざっくり以下。
仮想通貨の価格変動を受け、その日食べるべき食事を決定します。
人間の献立決定フローを削減するとともに、感情に流されないベストな食事を実現します。
twitterにより献立を発言することで多くのユーザに献立を提案することが可能となります。

The price change of the virtual currency determines the meal to eat that day.
We reduce the flow of menu decisions and achieve the best meal without being overwhelmed by emotion.
It is possible to propose a menu to many users by saying the menu via twitter.

第一段階として、ツイッター機能を利用して多くの人に献立を提案します。
今後の機能拡張により「いいね」機能などの追加を想定します。

As a first step, we propose a menu to many people using the Twitter function.
It is assumed that "like" functions will be added by future function expansion.
2020年4月時点ではTwitterのApp承認は一瞬で完了し、すぐに利用開始できた。
Cloud9環境構築
Cloud9はGUIでファイル編集ができるうえ、Linuxコマンドラインを実行できる。
AWSコンソール > Cloud9から新規インスタンスを構築
cloud9にはもともとpython3.6がインストール済み。
下記から確認
$ python --versionLambda ファンクション作成
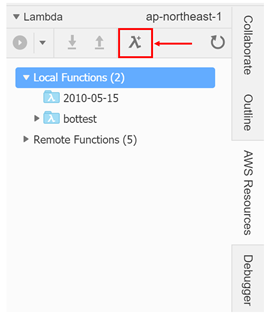
右ペインのAWS Resourcesからlocalにlambda functionを作成する。今回はbottestという名前にした。
下記よりbottestディレクトリを作成し、requestsパッケージをインストール。
$ mkdir bottest
$ cd bottest
$ python -m pip install --target=./ requests
また、bottestディレクトリにlambda_function.pyを作成する。
$touch ./lambda_function.pyLambda実行のpythonを下記のように記載した。
import json
import requests

def lambda_handler(event, context):

    url_items = 'https://bitflyer.com/api/echo/price'
    r_get = requests.get(url_items).json()
    print(r_get)
    print(r_get['mid'])
Lambdaテスト実行 & デプロイ
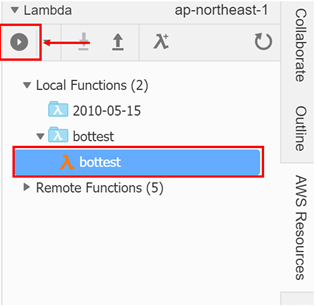
LocalのLambda Functionを選択し、実行ボタンを押下する。
Errorが出ず正しく実行出来たら、「↑」ボタンを押下し作成したLumbda Functionをリモートにデプロイする。
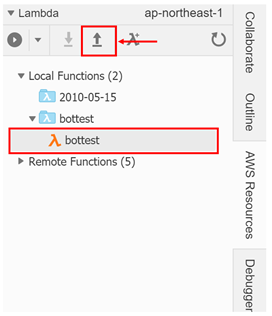
リモートにデプロイすると、AWS ConsoleのLambdaからFunction実行ができる。
boto3のインストール
LambdaではPython3を使用してコードを書いているため、
S3オブジェクトへの読み書きはAWS SDK(boto3)をして行う。
$ cd bottest
$ python -m pip install --target=./ boto3
S3の準備
今回はS3に置いたファイル(CSV)への書き込みを想定している。
そこで、S3作成のほか下記を用意する。
bucket_name = 'bottest-200423'
s3_prefix = 'dailyRate'
CSVファイル = dailyRate.csv
※ CSV utf-8 (コンマ区切り)(*.csv)で保存する
S3オブジェクトの読み込みを試す
S3オブジェクトの読み込みは下記のコードで可能となる。
import boto3

def lambda_handler(event, context):

    # difinition
    bucket_name = 'bottest-200423'
    s3_prefix = 'dailyRate'
    fileName = 'dailyRate.csv'
    s3 = boto3.client('s3')
    key=s3_prefix+"/"+fileName

    # get S3 Object
    response = s3.get_object(Bucket=bucket_name, Key=key)
    body = response['Body'].read()

    bodystr = body.decode('utf-8')
    lines = bodystr.split('\r\n')

    print(lines)
Lambda Functionを実行するとファイルの中身が確認できる。
※ CSVファイルにはあらかじめ何か記載しているものとする。
date,rate
2015-01-01,test
S3オブジェクトの読み込み⇒書き込みを試す
S3オブジェクトを読み込み、追記したい場合は下記のようなコードとなる。
import boto3

def lambda_handler(event, context):

    # difinition
    bucket_name = 'bottest-200423'
    s3_prefix = 'dailyRate'
    fileName = 'dailyRate.csv'
    s3 = boto3.client('s3')
    s3_resource = boto3.resource('s3')
    key=s3_prefix+"/"+fileName

    # get S3 Object
    response = s3.get_object(Bucket=bucket_name, Key=key)
    body = response['Body'].read()
    bodystr = body.decode('utf-8')
    lines = bodystr.split('\r\n')

    lines[-1]="test,test"

    # write S3 Object
    writelines = []
    for line in lines :
        line = line + '\r\n'
        writelines.append(line)
    writebody = "".join(writelines)
    writebody = writebody.encode('utf-8')

    bucket = s3_resource.Object(bucket_name,key)
    bucket.put(Body=writebody)
Lambda Function実行後、S3からCSVをダウンロードすると
追記できていることが分かる。
Bitflyer APIから得た情報をS3オブジェクトに書き込む
上記で記載したBitflyer APIを使用し、API実行結果をS3のファイルに追記できるように変更する。
まずは、datetimeパッケージをインストール。(API実行日時取得のため)
$ cd bottest
$ python -m pip install --target=./ datetime
Lambdaファンクションを変更する
import json
import requests
import datetime
import boto3

def lambda_handler(event, context):

    # difinition
    bucket_name = 'bottest-200423'
    s3_prefix = 'dailyRate'
    fileName = 'dailyRate.csv'
    s3 = boto3.client('s3')
    s3_resource = boto3.resource('s3')
    key=s3_prefix+"/"+fileName

    # get S3 Object
    response = s3.get_object(Bucket=bucket_name, Key=key)
    body = response['Body'].read()
    bodystr = body.decode('utf-8')
    lines = bodystr.split('\r\n')

    # today rate
    url_items = 'https://bitflyer.com/api/echo/price'
    r_get = requests.get(url_items).json()
    lines[-1]=datetime.date.today().strftime('%Y-%m-%d')+","+str(r_get['mid'])

    # write S3 Object
    writelines = []
    for line in lines :
        line = line + '\r\n'
        writelines.append(line)
    writebody = "".join(writelines)
    writebody = writebody.encode('utf-8')
    bucket = s3_resource.Object(bucket_name,key)
    bucket.put(Body=writebody)
S3オブジェクトには1か月分のデータを保持する
S3オブジェクトに毎日書き込みを行うと、ファイルサイズが大きくなる心配があります。
過去にさかのぼるとしても1か月分あればとりあえず十分なので、それ以前のデータを削除するようなプログラムにします。
「# write S3 Object (on this month)」にあたる部分がそれです。
一か月前の日付を取得し、
one_month_ago = datetime.datetime(today.year, today.month-1, today.day)一か月以内のデータのみ書き込むようにしています。
          if(line_date >= one_month_ago):
                line = line + '\r\n'
                writelines.append(line)
import json
import requests
import datetime
import boto3
def lambda_handler(event, context):
# difinition
bucket_name = 'bottest-200423'
s3_prefix = 'dailyRate'
fileName = 'dailyRate.csv'
s3 = boto3.client('s3')
s3_resource = boto3.resource('s3')
key=s3_prefix+"/"+fileName
# get S3 Object
response = s3.get_object(Bucket=bucket_name, Key=key)
body = response['Body'].read()
bodystr = body.decode('utf-8')
lines = bodystr.split('\r\n')
# today rate
url_items = 'https://bitflyer.com/api/echo/price'
r_get = requests.get(url_items).json()
lines[-1]=datetime.date.today().strftime('%Y-%m-%d')+","+str(r_get['mid'])
# write S3 Object (on this month)
writelines = []
today= datetime.datetime.today()
one_month_ago = datetime.datetime(today.year, today.month-1, today.day)
for line in lines:
if(line[0:1]=="2") :
line_date = datetime.datetime.strptime(line[0:10], '%Y-%m-%d')
if(line_date >= one_month_ago):
line = line + '\r\n'
writelines.append(line)
else :
line = line + '\r\n'
writelines.append(line)
writebody = "".join(writelines)
writebody = writebody.encode('utf-8')
bucket = s3_resource.Object(bucket_name,key)
bucket.put(Body=writebody)仮想通貨の前日比較を計算する
前日の仮想通貨価格と当日の仮想通貨価格を比較し、
上昇率に応じて発するメッセージを変えるようにします。
※ 「# today rate」に追記しています。
※ 現在はprintにしていますが、この後ツイートできるように変更します。
import json
import requests
import datetime
import boto3
import math

def lambda_handler(event, context):

    # difinition
    bucket_name = 'bottest-200423'
    s3_prefix = 'dailyRate'
    fileName = 'dailyRate.csv'
    s3 = boto3.client('s3')
    s3_resource = boto3.resource('s3')
    key=s3_prefix+"/"+fileName

    # get S3 Object
    response = s3.get_object(Bucket=bucket_name, Key=key)
    body = response['Body'].read()
    bodystr = body.decode('utf-8')
    lines = bodystr.split('\r\n')

    # today rate
    url_items = 'https://bitflyer.com/api/echo/price'
    r_get = requests.get(url_items).json()
    first_2_digits = math.floor(r_get['mid']/10000)
    lines[-1]=datetime.date.today().strftime('%Y-%m-%d')+","+str(r_get['mid'])
    if(lines[-2][0:1]=="2"):
        day_before_ratio = (float(lines[-1][11:])/float(lines[-2][11:])-1)*100
        if(day_before_ratio > 10):
            print("BitCoin:"+str(first_2_digits)+"万"+str(math.floor(r_get['mid']-first_2_digits*10000))+"円\r"
            +"前日上昇率:"+str(round(day_before_ratio, 2))+"%\r"
            +"今日は焼肉にしよう")
        elif(10 >= day_before_ratio > 2):
            print("BitCoin:"+str(first_2_digits)+"万"+str(math.floor(r_get['mid']-first_2_digits*10000))+"円\r"
            +"前日上昇率:"+str(round(day_before_ratio, 2))+"%\r"
            +"今日は外食しよう")
        elif(2 >= day_before_ratio > -2):
            print("BitCoin:"+str(first_2_digits)+"万"+str(math.floor(r_get['mid']-first_2_digits*10000))+"円\r"
            +"前日上昇率:"+str(round(day_before_ratio, 2))+"%\r"
            +"今日は自炊しよう")
        elif(-2 >= day_before_ratio > -10):
            print("BitCoin:"+str(first_2_digits)+"万"+str(math.floor(r_get['mid']-first_2_digits*10000))+"円\r"
            +"前日上昇率:"+str(round(day_before_ratio, 2))+"%\r"
            +"今日は冷凍チャーハンにしよう")
        else :
            print("BitCoin:"+str(first_2_digits)+"万"+str(math.floor(r_get['mid']-first_2_digits*10000))+"円\r"
            +"前日上昇率:"+str(round(day_before_ratio, 2))+"%\r"
            +"今日はモヤシ炒めにしよう")

    # write S3 Object (on this month)
    writelines = []
    today= datetime.datetime.today()
    one_month_ago = datetime.datetime(today.year, today.month-1, today.day)
    for line in lines:
        if(line[0:1]=="2") :
            line_date = datetime.datetime.strptime(line[0:10], '%Y-%m-%d')
            if(line_date >= one_month_ago):
                line = line + '\r\n'
                writelines.append(line)
        else :
            line = line + '\r\n'
            writelines.append(line)
    writebody = "".join(writelines)
    writebody = writebody.encode('utf-8')
    bucket = s3_resource.Object(bucket_name,key)
    bucket.put(Body=writebody)
Lambdaからツイートする
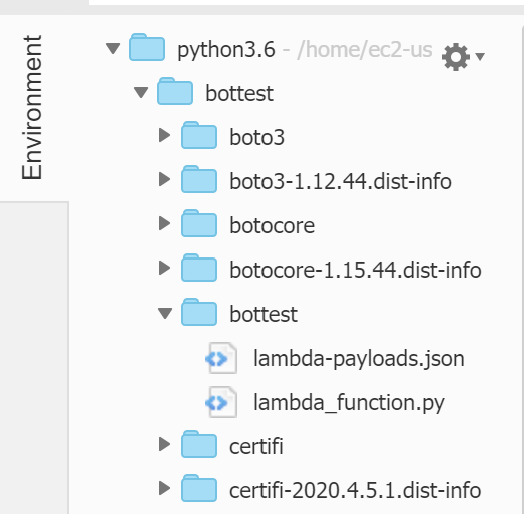
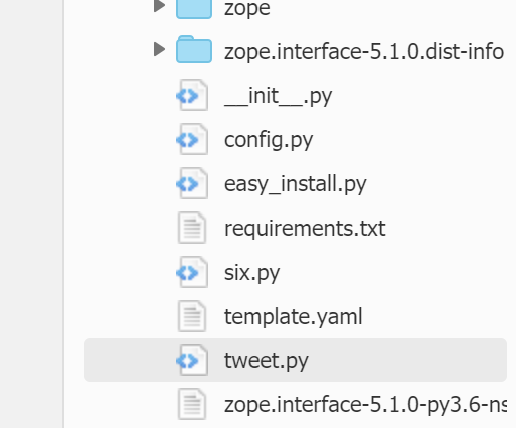
ディレクトリの構成とファイルの配置は以下となる。以下のconfig.pyとtweet.pyを作成する。
パッケージのインストール
$ cd bottest
$ python -m pip install --target=./ requests-oauthlib
config.pyの作成
API_KEY = "******************"
API_KEY_SECRET = "******************"
ACCESS_TOKEN = "******************"
ACCESS_TOKEN_SECRET = "******************"
tweet.pyの作成
import json, config
from requests_oauthlib import OAuth1Session

def tweet(tweetBody):
    AK = config.API_KEY
    AKS = config.API_KEY_SECRET
    AT = config.ACCESS_TOKEN
    ATS = config.ACCESS_TOKEN_SECRET
    twitter = OAuth1Session(AK, AKS, AT, ATS)
    url = "https://api.twitter.com/1.1/statuses/update.json"
    params = {"status" : tweetBody}

    # tweet
    res = twitter.post(url, params = params)

    if res.status_code == 200:
        print("Success.")
    else:
        print("Failed. : %d"% res.status_code)
Lambdaファンクションの編集
import json, requests, datetime, boto3, math, config, tweet

def lambda_handler(event, context):

    # difinition
    bucket_name = 'bottest-200423'
    s3_prefix = 'dailyRate'
    fileName = 'dailyRate.csv'
    s3 = boto3.client('s3')
    s3_resource = boto3.resource('s3')
    key=s3_prefix+"/"+fileName

    # get S3 Object
    response = s3.get_object(Bucket=bucket_name, Key=key)
    body = response['Body'].read()
    bodystr = body.decode('utf-8')
    lines = bodystr.split('\r\n')

    # today rate
    url_items = 'https://bitflyer.com/api/echo/price'
    r_get = requests.get(url_items).json()
    first_2_digits = math.floor(r_get['mid']/10000)
    lines[-1]=datetime.date.today().strftime('%Y-%m-%d')+","+str(r_get['mid'])
    if(lines[-2][0:1]=="2"):
        day_before_ratio = (float(lines[-1][11:])/float(lines[-2][11:])-1)*100
        if(day_before_ratio > 10):
            tweetBody=("今日は焼肉にしよう\r"
                +"\r"
                +"だって\r"
                +"BitCoin:"+str(first_2_digits)+"万"+str(math.floor(r_get['mid']-first_2_digits*10000))+"円\r"
                +"前日上昇率:"+str(round(day_before_ratio, 2))+"%\r"
                +"だもん!!")
            tweet.tweet(tweetBody)
        elif(10 >= day_before_ratio > 2):
            tweetBody=("今日は外食しよう\r"
            +"\r"
            +"だって\r"
            +"BitCoin:"+str(first_2_digits)+"万"+str(math.floor(r_get['mid']-first_2_digits*10000))+"円\r"
            +"前日上昇率:"+str(round(day_before_ratio, 2))+"%\r"
            +"だもん!")
            tweet.tweet(tweetBody)
        elif(2 >= day_before_ratio > -2):
            tweetBody=("今日は自炊しよう\r"
            +"\r"
            +"だって\r"
            +"BitCoin:"+str(first_2_digits)+"万"+str(math.floor(r_get['mid']-first_2_digits*10000))+"円\r"
            +"前日上昇率:"+str(round(day_before_ratio, 2))+"%\r"
            +"だもん。")
            tweet.tweet(tweetBody)
        elif(-2 >= day_before_ratio > -10):
            tweetBody=("今日は冷凍チャーハンにしよう\r"
            +"\r"
            +"だって\r"
            +"BitCoin:"+str(first_2_digits)+"万"+str(math.floor(r_get['mid']-first_2_digits*10000))+"円\r"
            +"前日上昇率:"+str(round(day_before_ratio, 2))+"%\r"
            +"だもん。。")
            tweet.tweet(tweetBody)
        else :
            tweetBody=("今日はモヤシ炒めにしよう\r"
            +"\r"
            +"だって\r"
            +"BitCoin:"+str(first_2_digits)+"万"+str(math.floor(r_get['mid']-first_2_digits*10000))+"円\r"
            +"前日上昇率:"+str(round(day_before_ratio, 2))+"%\r"
            +"だもん。。。")
            tweet.tweet(tweetBody)

    # write S3 Object (on this month)
    writelines = []
    today= datetime.datetime.today()
    one_month_ago = datetime.datetime(today.year, today.month-1, today.day)
    for line in lines:
        if(line[0:1]=="2") :
            line_date = datetime.datetime.strptime(line[0:10], '%Y-%m-%d')
            if(line_date >= one_month_ago):
                line = line + '\r\n'
                writelines.append(line)
        else :
            line = line + '\r\n'
            writelines.append(line)
    writebody = "".join(writelines)
    writebody = writebody.encode('utf-8')
    bucket = s3_resource.Object(bucket_name,key)
    bucket.put(Body=writebody)
参考にした記事
- https://qiita.com/bakira/items/00743d10ec42993f85eb
- https://qiita.com/kngsym2018/items/2524d21455aac111cdee
最終デプロイ
ここまででlambdaファンクションが最終化されたが、デプロイするまでにはもう少し作業が必要となる。
IAM作成
IAM > ロール作成から
- ロール :do_lambda_with_s3_read_and_write
- ユースケース:lambda
- ポリシー作成:s3_read_and_write
{
    "Version": "2012-10-17",
    "Statement": [
        {
            "Sid": "ListObjectsInBucket",
            "Effect": "Allow",
            "Action": ["s3:ListBucket"],
            "Resource": ["arn:aws:s3:::bottest-200423"]
        },
        {
            "Sid": "AllObjectActions",
            "Effect": "Allow",
            "Action": "s3:*Object",
            "Resource": ["arn:aws:s3:::bottest-200423/*"]
        }
    ]
}
参考:https://docs.aws.amazon.com/ja_jp/IAM/latest/UserGuide/reference_policies_examples_s3_rw-bucket.html
lambdaのロール変更
lambda > cloud9-bottest-…. > アクセス権限 > 実行ロール > 編集から、
ロールをdo_lambda_with_s3_read_and_writeに設定する。
テスト実行
lambdaファンクションを実行してみて、正しくツイートできているか検証する
トリガーを追加
定期的にツイートするbotにするため、定期的にキックされるようなトリガーを設定する。今回はAM10時にlambdaが起動するように設定した。
- type:CloudWatch Events/EventBridge
- ルール:新規作成
- ルール名:AM10
- スケジュール式:cron(0 1 * * ? *)
※ 日と曜日のどちらかは「?」でなければいけない。
参考:https://docs.aws.amazon.com/AmazonCloudWatch/latest/events/ScheduledEvents.html#CronExpressions
おわりに
AWS Lambdaを使用することでコストを最小化してTwitter Botを実装することができた。
Twitter Bot作成までの流れを一通り確認できたが、何をツイートさせるかが一番難しいと感じた。